
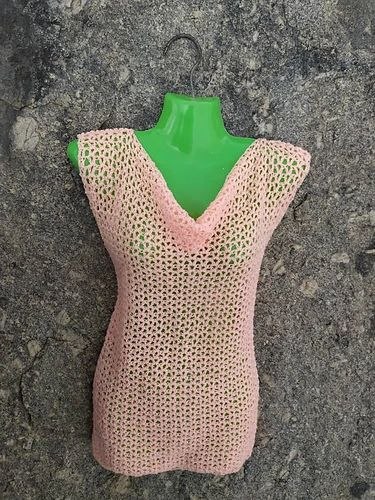
This is another summer inspired crochet top. It is lacy, light and yet stylish. The crochet cowl neck top will make a lovely addition to your wardrobe. It is easy to make as it is so repetitive you could make it while watching television. It requires light weight yarn so the final top is very light and comfy.
DESIGN
The crochet cowl neck top uses mainly the V stitch to achieve the lacy look for this light weight crochet top pattern. The front panel is made working bottom up, some increases are made at the top to achieve the cowl neck, the back panel is then made, both panels are seamed leaving space for arm holes and your crochet cowl neck top is done.
EASY
This easy crochet top pattern is quite yto make. The instructions for most of the pattern is quite repetitive, making it perfect crochet top pattern to make while listening to your favorite audio book.
YARN
I used fingering weight yarn to achieve the light weight of this easy crochet top pattern. You can use any fingering weight yarn in any beautiful color of your choice.
SIZE
The crochet cowl neck top pattern has 9 sizing options which includes X-Small, Small, Medium, Large, X-large, 2X, 3X, 4X and 5X. This blog post contains instructions for bust size 34-36 inches.
Read on to find the free crochet pattern below or find the ad-free printable pdf version on Ravelry, Love Crafts, Ko-fi and Etsy.
If you prefer to work with UK terms please scroll further down the page to view the UK version.
Video Tutorial
If you prefer video tutorials, you can watch the video tutorial for this crochet cowl neck top above.
Also watch more crochet video tutorials of my patterns on my YouTube channel. Subscribe and turn on notifications so you won’t miss any of my future videos. Happy crocheting!
PDF PATTERN
If you prefer to work offline or if you would like to support my work, purchase the ad-free printable pdf version, including all photo tutorials and additional sizing options up to bust 62 inches on Ravelry, Love Crafts, Ko-fi and Etsy.
Purchase the Ad-Free PDF below


PIN it for later here

Save this pattern to your Ravelry favourites here
Check Out These Other Free Crochet Patterns
EASY CROCHET COWL NECK TOP | FREE PATTERN
Materials
Fingering weight yarn
5.0 mm crochet hook
Stitch markers
Tapestry needle
Scissors
Stitches (US Version)
Ch: Chain
Dc: Double crochet
V stitch: (Dc Ch 1 Dc) all in the same space.
Gauge :
8 rows/6 stitches= 10 cm/4 inches in V stitch
Pattern note
- Chain 3 counts as a stitch
- Chain up loosely
- The 2 DC on the edges count as V stitches.
- The guage was taken after been blocked
Pattern instructions
Front Panel
Ch 70(76,82,94,100,106,112,124,130)
Row 1: Dc in 4th chain from hook, Ch 1, skip 1, V stitch in next stitch, skip 2 chains V stitch in next chain repeat till the end of the row. Finish the row with Ch 1,skip 2 chains Dc in the last two stitches. 25 V stitches including the 2 Dc on the edges.
Row 2: Ch 3 and turn, 1 Dc in the next stitch, Ch 1, V stitch in the Ch 1 space of the V stitch from previous row repeat till end of the row. Finish the row with Ch 1, 1 Dc in each of the last 2 Dc from previous row. 25 V stitche
Row 3 – 32: repeat row 2. Mark the centre V stitch, which is 13th V stitch.
Row 33: Ch 3 and turn, 1 Dc in the next stitch, Ch 1, V stitch in the Ch 1 space of the V stitch from previous row repeat till you reach the marked V stitch. Make 2 V stitches into the marked stitch, continue into the next stitch V stitch in the Ch 1 space of the V stitch from previous row repeat till end of the row. Finish the row with Ch 1, 1 Dc in each of the last 2 Dc from previous row. You should have 26 V stitches.
Row 34: Ch 3 and turn, 1 Dc in the next stitch, Ch 1, V stitch in the Ch 1 space of the V stitch from previous row repeat till end of the row. Finish the row with Ch 1, 1 Dc in each of the last 2 Dc from previous row. 26 V stitches.
Row 35: Ch 3 and turn, 1 Dc in the next stitch, Ch 1, V stitch in the Ch 1 space of the V stitch from previous row repeat till the 12th V stitch. Make 2 V stitches into the 13th & 14th V stitches, continue into the next stitch V stitch in the Ch 1 space of the V stitch from previous row repeat till end of the row. Finish the row with Ch 1, 1 Dc in each of the last 2 Dc from previous row. You should have 28 V stitches.
Row 36: Ch 3 and turn, 1 Dc in the next stitch, Ch 1, V stitch in the Ch 1 space of the V stitch from previous row repeat till end of the row. Finish the row with Ch 1, 1 Dc in each of the last 2 Dc from previous row. 28 V stitches.
Row 37: Ch 3 and turn, 1 Dc in the next stitch, Ch 1, V stitch in the Ch 1 space of the V stitch from previous row repeat till the 13th V stitch. Make 2 V stitches into the 14th 15th V stitche, continue into the next stitch V stitch in the Ch 1 space of the V stitch from previous row repeat till end of the row. Finish the row with Ch 1, 1 Dc in each of the last 2 Dc from previous row. You should have 30 V stitches.
Row 38: Ch 3 and turn, 1 Dc in the next stitch, Ch 1, V stitch in the Ch 1 space of the V stitch from previous row repeat till end of the row. Finish the row with Ch 1, 1 Dc in each of the last 2 Dc from previous row. 30 V stitches.
Row 39: Ch 3 and turn, 1 Dc in the next stitch, Ch 1, V stitch in the Ch 1 space of the V stitch from previous row repeat till the 14th V stitch. Make 2 V stitches into the 15th&16th V stitches, continue into the next stitch V stitch in the Ch 1 space of the V stitch from previous row repeat till end of the row. Finish the row with Ch 1, 1 Dc in each of the last 2 Dc from previous row. You should have 32 V stitches.
Row 40: Ch 3 and turn, 1 Dc in the next stitch, Ch 1, V stitch in the Ch 1 space of the V stitch from previous row repeat till end of the row. Finish the row with Ch 1, 1 Dc in each of the last 2 Dc from previous row. 32 V stitches.
Row 41: Ch 3 and turn, 1 Dc in the next stitch, Ch 1, V stitch in the Ch 1 space of the V stitch from previous row repeat till the 15th V stitch. Make 2 V stitches into the 16th 17th V stitche, continue into the next stitch V stitch in the Ch 1 space of the V stitch from previous row repeat till end of the row. Finish the row with Ch 1, 1 Dc in each of the last 2 Dc from previous row. You should have 34 V stitches.
Row 42 -45: Ch 3 and turn, 1 Dc in the next stitch, Ch 1, V stitch in the Ch 1 space of the V stitch from previous row repeat till end of the row. Finish the row with Ch 1, 1 Dc in each of the last 2 Dc from previous row. 34 V stitches. Ch1 and cut yarn.
Back Panel
Ch 70(76,82,94,100,106,112,124,130)
Row 1: Dc in 4th chain from hook, Ch 1, skip 1, V stitch in next stitch, skip 2 chains V stitch in next chain repeat till the end of the row. Finish the row with Ch 1,skip 2 chains Dc in the last two stitches. 25 V stitches including the 2 Dc on the edges
Row 2: Ch 3 and turn, 1 Dc in the next stitch, Ch 1, V stitch in the Ch 1 space of the V stitch from previous row repeat till end of the row. Finish the row with Ch 1, 1 Dc in each of the last 2 Dc from previous row. 25 V stitches
Row 3-45: repeat row 2. 25 V stitches
Finishing
Shoulder seams
With right sides of both panel facing sew up 6 V stitches on both sides
Side seams
With the right sides facing and starting from the bottom, sew up the sides making sure that it aligns properly, leave the last 14 rows open for the arms.
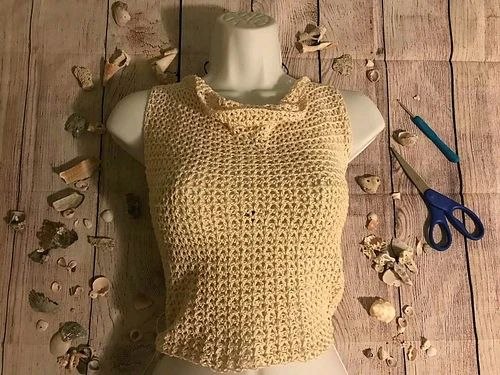
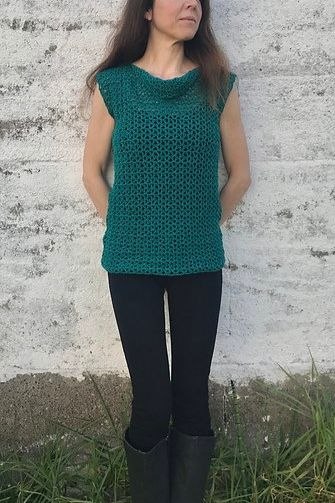
Finished Top
UK VERSION
EASY CROCHET COWL NECK TOP | FREE PATTERN
Materials
Fingering weight yarn
5.0 mm crochet hook
Stitch markers
Tapestry needle
Scissors
Stitches (UK Version)
Ch: Chain
Tr: Treble crochet
V stitch: (Tr Ch 1 Tr) all in the same space.
Gauge :
8 rows/6 stitches= 10 cm/4 inches in V stitch
Pattern note
- Chain 3 counts as a stitch
- Chain up loosely
- The 2 Tr on the edges count as V stitches.
- The guage was taken after been blocked
Pattern instructions
Front Panel
Ch 70(76,82,94,100,106,112,124,130)
Row 1: Tr in 4th chain from hook, Ch 1, skip 1, V stitch in next stitch, skip 2 chains V stitch in next chain repeat till the end of the row. Finish the row with Ch 1,skip 2 chains Tr in the last two stitches. 25 V stitches including the 2 Tr on the edges.
Row 2: Ch 3 and turn, 1 Tr in the next stitch, Ch 1, V stitch in the Ch 1 space of the V stitch from previous row repeat till end of the row. Finish the row with Ch 1, 1 Tr in each of the last 2 Tr from previous row. 25 V stitche
Row 3 – 32: repeat row 2. Mark the centre V stitch, which is 13th V stitch.
Row 33: Ch 3 and turn, 1 Tr in the next stitch, Ch 1, V stitch in the Ch 1 space of the V stitch from previous row repeat till you reach the marked V stitch. Make 2 V stitches into the marked stitch, continue into the next stitch V stitch in the Ch 1 space of the V stitch from previous row repeat till end of the row. Finish the row with Ch 1, 1 Tr in each of the last 2 Tr from previous row. You should have 26 V stitches.
Row 34: Ch 3 and turn, 1 Tr in the next stitch, Ch 1, V stitch in the Ch 1 space of the V stitch from previous row repeat till end of the row. Finish the row with Ch 1, 1 Tr in each of the last 2 Tr from previous row. 26 V stitches.
Row 35: Ch 3 and turn, 1 Tr in the next stitch, Ch 1, V stitch in the Ch 1 space of the V stitch from previous row repeat till the 12th V stitch. Make 2 V stitches into the 13th & 14th V stitches, continue into the next stitch V stitch in the Ch 1 space of the V stitch from previous row repeat till end of the row. Finish the row with Ch 1, 1 Tr in each of the last 2 Tr from previous row. You should have 28 V stitches.
Row 36: Ch 3 and turn, 1 Tr in the next stitch, Ch 1, V stitch in the Ch 1 space of the V stitch from previous row repeat till end of the row. Finish the row with Ch 1, 1 Tr in each of the last 2 Tr from previous row. 28 V stitches.
Row 37: Ch 3 and turn, 1 Tr in the next stitch, Ch 1, V stitch in the Ch 1 space of the V stitch from previous row repeat till the 13th V stitch. Make 2 V stitches into the 14th 15th V stitche, continue into the next stitch V stitch in the Ch 1 space of the V stitch from previous row repeat till end of the row. Finish the row with Ch 1, 1 Tr in each of the last 2 Tr from previous row. You should have 30 V stitches.
Row 38: Ch 3 and turn, 1 Tr in the next stitch, Ch 1, V stitch in the Ch 1 space of the V stitch from previous row repeat till end of the row. Finish the row with Ch 1, 1 Tr in each of the last 2 Tr from previous row. 30 V stitches.
Row 39: Ch 3 and turn, 1 Tr in the next stitch, Ch 1, V stitch in the Ch 1 space of the V stitch from previous row repeat till the 14th V stitch. Make 2 V stitches into the 15th&16th V stitches, continue into the next stitch V stitch in the Ch 1 space of the V stitch from previous row repeat till end of the row. Finish the row with Ch 1, 1 Tr in each of the last 2 Tr from previous row. You should have 32 V stitches.
Row 40: Ch 3 and turn, 1 Tr in the next stitch, Ch 1, V stitch in the Ch 1 space of the V stitch from previous row repeat till end of the row. Finish the row with Ch 1, 1 Tr in each of the last 2 Tr from previous row. 32 V stitches.
Row 41: Ch 3 and turn, 1 Tr in the next stitch, Ch 1, V stitch in the Ch 1 space of the V stitch from previous row repeat till the 15th V stitch. Make 2 V stitches into the 16th 17th V stitche, continue into the next stitch V stitch in the Ch 1 space of the V stitch from previous row repeat till end of the row. Finish the row with Ch 1, 1 Tr in each of the last 2 Tr from previous row. You should have 34 V stitches.
Row 42 -45: Ch 3 and turn, 1 Tr in the next stitch, Ch 1, V stitch in the Ch 1 space of the V stitch from previous row repeat till end of the row. Finish the row with Ch 1, 1 Tr in each of the last 2 Tr from previous row. 34 V stitches. Ch1 and cut yarn.
Back Panel
Ch 70(76,82,94,100,106,112,124,130)
Row 1: Tr in 4th chain from hook, Ch 1, skip 1, V stitch in next stitch, skip 2 chains V stitch in next chain repeat till the end of the row. Finish the row with Ch 1,skip 2 chains Tr in the last two stitches. 25 V stitches including the 2 Tr on the edges
Row 2: Ch 3 and turn, 1 Tr in the next stitch, Ch 1, V stitch in the Ch 1 space of the V stitch from previous row repeat till end of the row. Finish the row with Ch 1, 1 Tr in each of the last 2 Tr from previous row. 25 V stitches
Row 3-45: repeat row 2. 25 V stitches
Finishing
Shoulder seams
With right sides of both panel facing sew up 6 V stitches on both sides
Side seams
With the right sides facing and starting from the bottom, sew up the sides making sure that it aligns properly, leave the last 14 rows open for the arms.
Finished Top
Disclaimer:
All patterns and pictures on https://toyslabcreations.com is a property of Toyslab Creations. Please do not reprint, publish or post my patterns in whole or in part. Please don’t use my photos to advertise if you use my patterns to make and sell finished items.
Connect with me on Social Media