This post may contain affiliate links. This means that if you make a purchase from those links I receive a commission at no additional cost to you. Thank you for continued support!
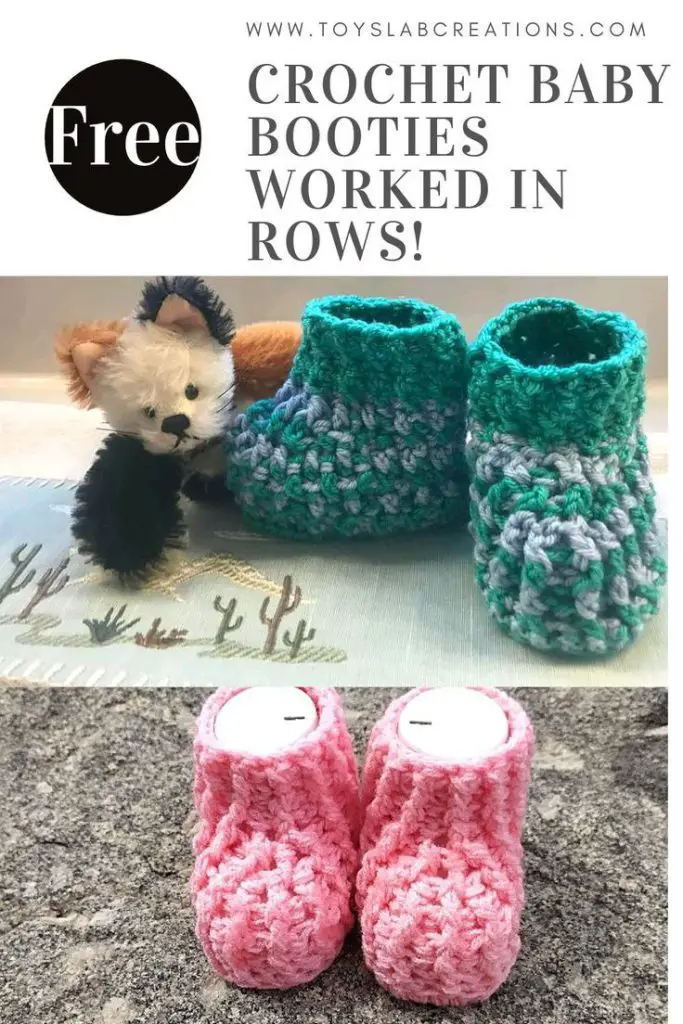
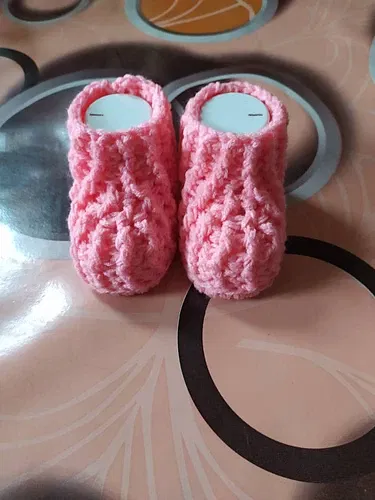
The unique crochet baby booties design pattern has a unique post stitch design on the upper part of the booties that gives different looks when two complementing colours is used, and when a single colour is but looks even better when you use two colours. It so easy to make and the final result is stunning.
With the unique crochet baby booties pattern you can make cute crochet baby booties just working in rows. It is easier and faster than working in the round and you can be sure that your booties will come out the same size. Heck Yeah! You won’t have to make a third bootie just to have two match up! This crochet baby booties pattern will be a great for baby shower gifts and newborn gifts.
DESIGN
The unique crochet baby booties pattern starts with the sole been worked flat, then the upper part of the crochet baby booties which mainly makes use of post stitches is made. The seam is sewn and your cute cozy crochet baby booties is ready!
COZY
The unique crochet baby booties pattern makes use of mainly the post stitches, making it extra thick and this keeps your baby’s feet warm and cozy. The pattern comes with a video tutorial to help visual learners understand the process better.
YARN
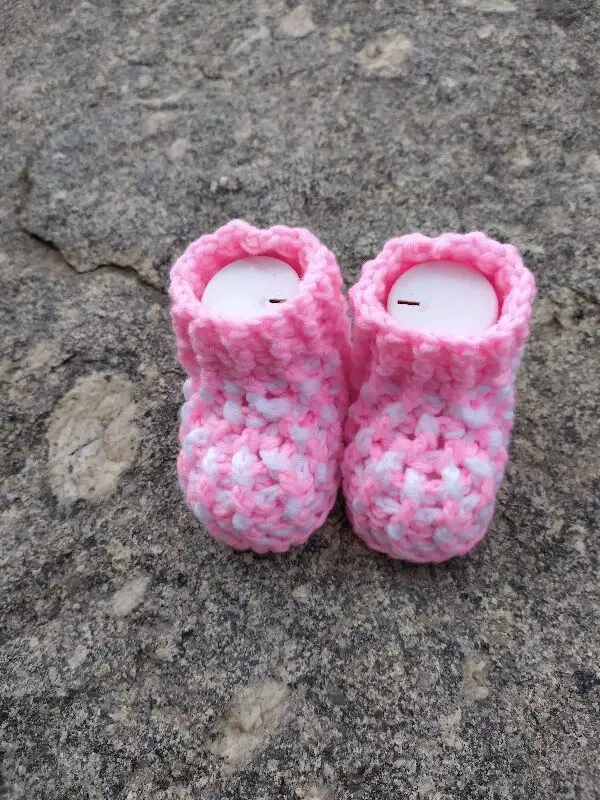
I used worsted weight yarn for this easy crochet baby booties pattern. You can use any worsted weight yarn of your choice, I made a pair in single colour and another pair using two complementary colors. You can try either option, both turned out great.
SIZES
The Ad-Free PDF pattern of this crochet baby booties pattern contains three sizing options. 0-6, 6-9 and 9-12 months sizes which are 4.0(4.5, 5.0) inches sole measurements. This blog post only provides instructions for size 0-6 months.
Read on to find the free crochet pattern for size 0-6 months (4.0 inch sole)below or find the ad-free printable pdf version on Ravelry, Love Crafts, Ko-fi and Etsy.
Video tutorial
If you prefer video tutorials, you can watch the video tutorial for this crochet baby booties above.
Also watch more crochet video tutorials of my patterns on my YouTube channel. Subscribe and turn on notifications so you won’t miss any of my future videos. Happy crocheting!
PDF PATTERN
If you prefer to work offline or if you would like to support my work or you want to make the pattern in bigger sizes, purchase the ad-free printable pdf version, including all photo tutorials on Ravelry, Love Crafts, Ko-fi and Etsy.
Purchase the Ad-Free PDF below


PIN it for later here
Save this pattern to your Ravelry favourites here
CHECK OUT THESE OTHER FREE CROCHET PATTERNS
US VERSION
Crochet Baby Booties | Free Pattern
Material
4.5 mm crochet hook
Worsted weight yarn – 100g
Colour A = Pink
Colour B = White
Yarn needle
Difficulty:
Beginner
Gauge :
18 stitches /16 rows= 10 cm/4 inch square in Sc
Stitches (US Version):
Ch: Chain
Sc: Single Crochet
Slst: Slip stitch
FPSCE: Front Post Single Crochet Extended
BPSCE: Back Post Single Crochet Extended
FPHDC: Front Post Half double crochet
BPHDC: Back Post Half double crochet
FPHDCE: Front Post Half double crochet extended
BPHDCE: Back Post Half double crochet extended
FPDC: Front Post Double Crochet
BPDC: Back Post Double Crochet
Dc2tog: Double crochet two together
Pattern note
- Ch 1 or Ch 2 at the beginning of the row does not count as a stitch.
- The bootie is worked flat
Pattern Instructions
With colour A Ch 25
Row 1: 1 Sc in the 2nd chain from the hook, Mark the stitch with a stitch marker, 1 Sc in each stitch across. 24 stitches.
Row 2: Ch 2, 2 Hdc in the 1st stitch, mark the very first stitch, 1 Hdc in the next 8 stitches, 2 Hdc in each of the next 6 stitches, 1 Hdc in the next 8 stitches, 2 Hdc in the last stitch. 32 stitches.
Row 3: Ch 2, 2 Hdc in the 1st stitch, mark the very first stitch, 1 Hdc in the next 30 stitches, 2 Hdc in the last stitch, finish the last Hdc with a Slst of Colour B. 34 stitches.
Row 4: (Colour B) Ch 1 and turn, 1 Sc in the front loop only of the 1st stitches, mark stitch, 1 Sc in the front loops only in each stitch across, finish the last Sc with a Slst of Colour A 34 stitches
Row 5: (Colour A) Ch 1 and turn, 1 FPSCE around the post of the first Sc, BPSCE around the post of the second Sc, keep alternating all the way across, finish the last Sc with a Slst of Colour B. 34 stitches.
Row 6: (Colour B) Ch 1 and turn, 1 FPSCE around the post of the first stitch, BPSCE around the post of the second stitch , keep alternating till the 9th (stitch, (it should be FPSCE), BPHDC around the next stitch, FPHDC around the next stitch, keep alternating till the 25th stitch (it should be FPHDC). 1 BPSCE around the post of the next stitch, FPSCE around the post of the next stitch, keep alternating till the end of row. (it should end with BPSCE), finish the last stitch with a Slst of Colour A. 34 stitches.
Row 7: (Colour A) Ch 1 and turn, 1 FPSCE around the post of the first stitch, BPSCE around the post of the second stitch , keep alternating till the 9th stitch, (it should be FPSCE), BPHDCE around the next stitch, FPHDCE around the next stitch, keep alternating till the 25th stitch (it should be FPHDCE). 1 BPSCE around the post of the next stitch, FPSCE around the post of the next stitch, keep alternating till the end of row. (it should end with BPSCE), finish the last stitch with a Slst of Colour B. 34 stitches.
Row 8: (Colour B) Ch 1 and turn, 1 FPSCE around the post of the first stitch, BPSCE around the post of the second stitch , keep alternating till the 9th stitch, (it should be FPSCE), BPHDC around the next stitch, FPHDC around the next stitch, repeat BPHDC and FPHDC once more. BPDC around the post of the next stitch do not finish it, FPDC around the post of the next stitch and finish the Dc2tog. (Repeat 3 more times). BPHDC around the next stitch, FPHDC around the next stitch, repeat BPHDC and FPHDC once more.BPSCE around the post of the next stitch, FPSCE around the post of the next stitch , keep alternating till the end of row. (it should end with BPSCE), finish the last stitch with a Slst of Colour A. 30 stitches.
Row 9: (Colour A) Ch 1 and turn, 1 FPSCE around the post of the first stitch, BPSCE around the post of the second stitch , keep alternating till the 9th stitch, (it should be FPSCE), BPHDC around the next stitch, FPHDC around the next stitch, repeat BPHDC and FPHDC once more. BPDC around the post of the next stitch do not finish it, FPDC around the post of the next stitch and finish the Dc2tog. (Repeat once more). BPHDC around the next stitch, FPHDC around the next stitch, repeat BPHDC and FPHDC once more. BPSCE around the post of the next stitch, FPSCE around the post of the next stitch , keep alternating till the end of row. (it should end with BPSCE), finish the last stitch with a Slst of Colour B. 28 stitches.
Row 10: (Colour B) Ch 1 and turn, 1 FPSCE around the post of the first stitch, BPSCE around the post of the second stitch , keep alternating till the 8th stitch, (it should be BPSCE), FPHDC around the next stitch, BPHDC around the next stitch, repeat FPHDC and BPHDC once more. FPDC around the post of the next stitch do not finish it, BPDC around the post of the next stitch and finish the Dc2tog. (Repeat once more). FPHDC around the next stitch, BPHDC around the next stitch, repeat FPHDC and BPHDC once more. FPSCE around the post of the next stitch, BPSCE around the post of the next stitch , keep alternating till the end of row. (it should end with BPSCE), finish the last stitch with a Slst of Colour A. 26 stitches.
Row 11: (Colour A) Ch 1 and turn, 1 FPSCE around the post of the first stitch, BPSCE around the post of the second stitch, keep alternating all the way across. 26 stitches.
Row 12-14: repeat row 11
Finishing
With the right sides facing, sew up the seam.
Finished Booties
UK VERSION
Crochet Baby Booties | Free Pattern
Material
4.5 mm crochet hook
Worsted weight yarn – 100g
Colour A = Pink
Colour B = White
Yarn needle
Difficulty:
Beginner
Gauge :
18 stitches /16 rows= 10 cm/4 inch square in Dc
Stitches (UK Version):
Ch: Chain
Dc: Double Crochet
Slst: Slip stitch
FPDCE: Front Post Double Crochet Extended
BPDCE: Back Post Double Crochet Extended
FPHTR: Front Post Half treble crochet
BPHTR: Back Post Half treble crochet
FPHTRE: Front Post Half treble crochet extended
BPHTRE: Back Post Half treble crochet extended
FPTR: Front Post Treble Crochet
BPTR: Back Post Treble Crochet
Tr2tog: Treble crochet two together
Pattern note
- Ch 1 or Ch 2 at the beginning of the row does not count as a stitch.
- The bootie is worked flat
Pattern Instructions
With colour A Ch 25
Row 1: 1 Dc in the 2nd chain from the hook, Mark the stitch with a stitch marker, 1 Dc in each stitch across. 24 stitches.
Row 2: Ch 2, 2 Hdc in the 1st stitch, mark the very first stitch, 1 Hdc in the next 8 stitches, 2 Hdc in each of the next 6 stitches, 1 Hdc in the next 8 stitches, 2 Hdc in the last stitch. 32 stitches.
Row 3: Ch 2, 2 Hdc in the 1st stitch, mark the very first stitch, 1 Hdc in the next 30 stitches, 2 Hdc in the last stitch, finish the last Hdc with a Slst of Colour B. 34 stitches.
Row 4: (Colour B) Ch 1 and turn, 1 Dc in the front loop only of the 1st stitches, mark stitch, 1 Dc in the front loops only in each stitch across, finish the last Dc with a Slst of Colour A 34 stitches
Row 5: (Colour A) Ch 1 and turn, 1 FPDCE around the post of the first Dc, BPDCE around the post of the second Dc, keep alternating all the way across, finish the last Dc with a Slst of Colour B. 34 stitches.
Row 6: (Colour B) Ch 1 and turn, 1 FPDCE around the post of the first stitch, BPDCE around the post of the second stitch , keep alternating till the 9th (stitch, (it should be FPDCE), BPHTR around the next stitch, FPHTR around the next stitch, keep alternating till the 25th stitch (it should be FPHTR). 1 BPDCE around the post of the next stitch, FPDCE around the post of the next stitch, keep alternating till the end of row. (it should end with BPDCE), finish the last stitch with a Slst of Colour A. 34 stitches.
Row 7: (Colour A) Ch 1 and turn, 1 FPDCE around the post of the first stitch, BPDCE around the post of the second stitch , keep alternating till the 9th stitch, (it should be FPDCE), BPHTRE around the next stitch, FPHTRE around the next stitch, keep alternating till the 25th stitch (it should be FPHTRE). 1 BPDCE around the post of the next stitch, FPDCE around the post of the next stitch, keep alternating till the end of row. (it should end with BPDCE), finish the last stitch with a Slst of Colour B. 34 stitches.
Row 8: (Colour B) Ch 1 and turn, 1 FPDCE around the post of the first stitch, BPDCE around the post of the second stitch , keep alternating till the 9th stitch, (it should be FPDCE), BPHTR around the next stitch, FPHTR around the next stitch, repeat BPHTR and FPHTR once more. BPTR around the post of the next stitch do not finish it, FPTR around the post of the next stitch and finish the Tr2tog. (Repeat 3 more times). BPHTR around the next stitch, FPHTR around the next stitch, repeat BPHTR and FPHTR once more.BPDCE around the post of the next stitch, FPDCE around the post of the next stitch , keep alternating till the end of row. (it should end with BPDCE), finish the last stitch with a Slst of Colour A. 30 stitches.
Row 9: (Colour A) Ch 1 and turn, 1 FPDCE around the post of the first stitch, BPDCE around the post of the second stitch , keep alternating till the 9th stitch, (it should be FPDCE), BPHTR around the next stitch, FPHTR around the next stitch, repeat BPHTR and FPHTR once more. BPTR around the post of the next stitch do not finish it, FPTR around the post of the next stitch and finish the Tr2tog. (Repeat once more). BPHTR around the next stitch, FPHTR around the next stitch, repeat BPHTR and FPHTR once more.
BPDCE around the post of the next stitch, FPDCE around the post of the next stitch , keep alternating till the end of row. (it should end with BPDCE), finish the last stitch with a Slst of Colour B. 28 stitches.
Row 10: (Colour B) Ch 1 and turn, 1 FPDCE around the post of the first stitch, BPDCE around the post of the second stitch , keep alternating till the 8th stitch, (it should be BPDCE), FPHTR around the next stitch, BPHTR around the next stitch, repeat FPHTR and BPHTR once more. FPTR around the post of the next stitch do not finish it, BPTR around the post of the next stitch and finish the Tr2tog. (Repeat once more). FPHTR around the next stitch, BPHTR around the next stitch, repeat FPHTR and BPHTR once more. FPDCE around the post of the next stitch, BPDCE around the post of the next stitch , keep alternating till the end of row. (it should end with BPDCE), finish the last stitch with a Slst of Colour A. 26 stitches.
Row 11: (Colour A) Ch 1 and turn, 1 FPDCE around the post of the first stitch, BPDCE around the post of the second stitch, keep alternating all the way across. 26 stitches.
Row 12-14: repeat row 11
Finishing
With the right sides facing, sew up the seam.
Finished Booties
Disclaimer:
All patterns and pictures on toyslabcreations.com is a property of Toyslab Creations. Please do not reprint, publish or post my patterns in whole or in part. Please don’t use my photos to advertise if you use my patterns to make and sell finished items.
Connect with me on Social Media