
This post may contain affiliate links. This means that if you make a purchase from those links I receive a commission at no additional cost to you. Thank you for continued support!
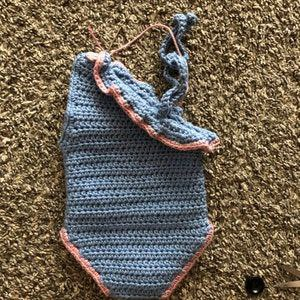
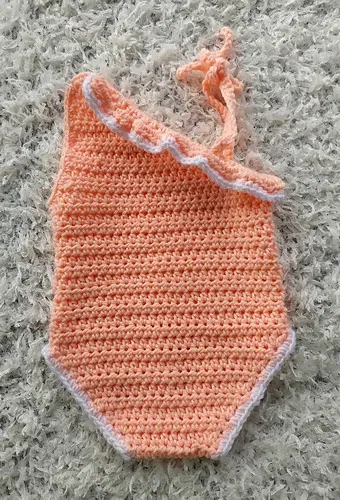
Looking for something lovely for your baby girl for summer? This little princess crochet baby romper is the answer. This crochet baby romper is so cute with the mono strap detail. Looks great in all girly colours plus it has an excellent fit.
DESIGN
This crochet baby romper is a very simple, yet unique design. It is worked bottom up, with the front and back panels made separately. It has a mono strap design and a beautiful ruffle detailing. This crochet baby romper is super cute and great for the beach.
BEGINNER FRIENDLY
The mono strap crochet baby romper is great for beginners as it uses simple crochet stitches to achieve this beautiful look. It also comes with a video tutorial to guide crochet beginners
EASY AND FAST
This crochet baby romper isn’t just cute, it is also very easy and works up super fast. It is great for quick baby gifts and you can be sure it will be a unique gift for a baby to receive.
MAKE IT YOUR OWN
You can decide to add an applique of your choice to your own crochet romper. I added a heart embellishment to the first one I made. I did not add any applique to the second one.
YARN
I used Dk weight yarn for this easy crochet baby romper pattern. You can use any Dk weight yarn of your choice.
SIZES
The written PDF pattern contains four sizing options. 0-3, 3-6, 6-9 and 9-12 months sizes. The 0-3 size is written below.
Read on to find the free version of this crochet baby romper pattern for size 0-3 months below or find the ad-free printable pdf version on Ravelry, Love Crafts, Ko-fi and Etsy.
Video Tutorial
If you prefer video tutorials, you can watch the video tutorial for this crochet baby romper above.
Also watch more crochet video tutorials of my patterns on my YouTube channel. Subscribe and turn on notifications so you won’t miss any of my future videos. Happy crocheting!
PDF PATTERN
If you prefer to work offline or if you would like to support my work, purchase the ad-free printable pdf version, including all photo tutorials on Ravelry, Love Crafts, Ko-fi and Etsy.
Purchase the Ad-free PDF pattern


PIN it for later here

Save this pattern to your Ravelry favourite here
Check out these other free crochet patterns
CROCHET BABY GIRL ROMPER
Materials:
5.0 mm and 4.0mm crochet hook
Dk weight yarn
Colour A = Pink
Colour B = White
Stitch markers
Yarn needle
1 Buttons
Difficulty:
Advanced beginner
Stitch Guide (US Version):
Ch: Chain
Hdc: Half double crochet
Hdc2tog: Half double crochet two together
Hdc3tog: Half double crochet three together
Slst: Slip stitch
PATTERN INSTRUCTIONS
Front Panel
With 5.0mm hook
Ch 12
Row 1: Hdc in the 3rd chain from the hook, Hdc in each chain across. (10 Hdc)
Row 2: Ch 2, turn 2 Hdc in the first stitch, 1 Hdc in each stitch across, 2 Hdc in the last stitch. (12 Hdc)
Row 3: Ch 2, turn 2 Hdc in the first stitch, 1 Hdc in each stitch across, 2 Hdc in the last stitch. (14 Hdc)
Row 4: Ch 2, turn 2 Hdc in the first stitch, 1 Hdc in each stitch across, 2 Hdc in the last stitch. (16 Hdc)
Row 5: Ch 2, turn 2 Hdc in the first stitch, 1 Hdc in each stitch across, 2 Hdc in the last stitch. (18 Hdc)
Row 6: Ch 2, turn 2 Hdc in the first stitch, 1 Hdc in each stitch across, 2 Hdc in the last stitch. (20 Hdc)
Row 7: Ch 2, turn 2 Hdc in the first stitch, 1 Hdc in each stitch across, 2 Hdc in the last stitch. (22 Hdc)
Row 8: Ch 2, turn 2 Hdc in the first stitch, 1 Hdc in each stitch across, 2 Hdc in the last stitch. (24 Hdc)
Row 9: Ch 2, turn 2 Hdc in the first stitch, 1 Hdc in each stitch across, 2 Hdc in the last stitch. (26 Hdc)
Row 10: Ch 2, turn 2 Hdc in the first stitch, 1 Hdc in each stitch across, 2 Hdc in the last stitch. (28 Hdc)
Row 11-23: Ch 2, turn, 1 Hdc in each stitch across, (28 Hdc)
Row 24: Ch 2, turn Hdc3tog, 1 Hdc in each stitch, Hdc2tog the last two stitches (25 stitches)
Row 25: Ch 2, turn Hdc2tog, 1 Hdc in each stitch, Hdc3tog the last three stitches (22 stitches)
Row 26: Ch 2, turn Hdc3tog, 1 Hdc in each stitch across (20 stitches)
Row 27: Ch 2, turn, 1 Hdc in each stitch, Hdc3tog the last three stitches. (18 stitches)
Row 28: Ch 2, turn Hdc3tog, 1 Hdc in each stitch across (16 stitches)
Row 29: Ch 2, turn, 1 Hdc in each stitch, Hdc3tog the last three stitches. (14 stitches)
Row 30: Ch 2, turn Hdc3tog, 1 Hdc in each stitch across (12 stitches)
Row 31: Ch 2, turn, 1 Hdc in each stitch, Hdc3tog the last three stitches. (10 stitches)
Row 32: Ch 2, turn Hdc3tog, 1 Hdc in each stitch across (8 stitches)
Row 33: Ch 2, turn, 1 Hdc in each stitch, Hdc3tog the last three stitches. (6 stitches)
Row 34: Ch 2, turn Hdc3tog, 1 Hdc in each stitch across (4 stitches)
Chain 3 slip stitch to the first stitch of row 34, turn, make 4 Sc around the Ch 3, slip stitch to the last stitch of row 34. Button hole completed.
Back Panel
Repeat same as front panel
Row 35: Ch 2, turn, 1 Hdc in each stitch across. 4Hdc. The button is sewn onto this row.
FINISHING
Place the front panel over the back panel and sew the sides,that is sew row 11-23 on both sides.
Sew the buttom part together.
With 4.0 mm hook
Sc around the leg parts with Colour B
On the slanted side, with the wrong side facing you, rejoin yarn with Slst to the side of row 34
Row 1: Ch 2, 2 hdc in the space, 2 Hdc to the top of row 33 continue all the way to the back at row 34
Row 2: Ch 2, turn, 3 Hdc in the first stitch, 1 Hdc in the next, 3dc in the next. Repeat all the way to the beginning of row 1, finish the last Hdc with a Slst of Colour B
Row 3: Ch 1, turn, 1 Sc in each stitch across. Ch 1 and cut yarn.
Rejoin yarn to the Hdc3tog of row 27 Ch 40, Sc in the second chain from the hook and in each chain across. Slst back to the Hdc3tog space, Ch 1 and cut yarn.
Repeat same for back panel
Sc around the armhole where the button is with Colour A.
Make any applique of your choice and attach.
Sew the button to the last row of the back panel.
Weave in all ends.
FINISHED ROMPER

UK VERSION
CROCHET BABY GIRL ROMPER | FREE PATTERN
Materials:
5.0 mm and 4.0mm crochet hook
Dk weight yarn
Colour A = Pink
Colour B = White
Stitch markers
Yarn needle
1 Buttons
Difficulty:
Advanced beginner
Stitch Guide (UK Version):
Ch: Chain
Htr: Half treble crochet
Htr2tog: Half treble crochet two together
Htr3tog: Half treble crochet three together
Slst: Slip stitch
PATTERN INSTRUCTIONS
Front Panel
With 5.0mm hook
Ch 12
Row 1: Htr in the 3rd chain from the hook, Htr in each chain across. (10 Htr)
Row 2: Ch 2, turn 2 Htr in the first stitch, 1 Htr in each stitch across, 2 Htr in the last stitch. (12 Htr)
Row 3: Ch 2, turn 2 Htr in the first stitch, 1 Htr in each stitch across, 2 Htr in the last stitch. (14 Htr)
Row 4: Ch 2, turn 2 Htr in the first stitch, 1 Htr in each stitch across, 2 Htr in the last stitch. (16 Htr)
Row 5: Ch 2, turn 2 Htr in the first stitch, 1 Htr in each stitch across, 2 Htr in the last stitch. (18 Htr)
Row 6: Ch 2, turn 2 Htr in the first stitch, 1 Htr in each stitch across, 2 Htr in the last stitch. (20 Htr)
Row 7: Ch 2, turn 2 Htr in the first stitch, 1 Htr in each stitch across, 2 Htr in the last stitch. (22 Htr)
Row 8: Ch 2, turn 2 Htr in the first stitch, 1 Htr in each stitch across, 2 Htr in the last stitch. (24 Htr)
Row 9: Ch 2, turn 2 Htr in the first stitch, 1 Htr in each stitch across, 2 Htr in the last stitch. (26 Htr)
Row 10: Ch 2, turn 2 Htr in the first stitch, 1 Htr in each stitch across, 2 Htr in the last stitch. (28 Htr)
Row 11-23: Ch 2, turn, 1 Htr in each stitch across, (28 Htr)
Row 24: Ch 2, turn Htr3tog, 1 Htr in each stitch, Htr2tog the last two stitches (25 stitches)
Row 25: Ch 2, turn Htr2tog, 1 Htr in each stitch, Htr3tog the last three stitches (22 stitches)
Row 26: Ch 2, turn Htr3tog, 1 Htr in each stitch across (20 stitches)
Row 27: Ch 2, turn, 1 Htr in each stitch, Htr3tog the last three stitches. (18 stitches)
Row 28: Ch 2, turn Htr3tog, 1 Htr in each stitch across (16 stitches)
Row 29: Ch 2, turn, 1 Htr in each stitch, Htr3tog the last three stitches. (14 stitches)
Row 30: Ch 2, turn Htr3tog, 1 Htr in each stitch across (12 stitches)
Row 31: Ch 2, turn, 1 Htr in each stitch, Htr3tog the last three stitches. (10 stitches)
Row 32: Ch 2, turn Htr3tog, 1 Htr in each stitch across (8 stitches)
Row 33: Ch 2, turn, 1 Htr in each stitch, Htr3tog the last three stitches. (6 stitches)
Row 34: Ch 2, turn Htr3tog, 1 Htr in each stitch across (4 stitches)
Chain 3 slip stitch to the first stitch of row 34, turn, make 4 Sc around the Ch 3, slip stitch to the last stitch of row 34. Button hole completed.
Back Panel
Repeat same as front panel
Row 35: Ch 2, turn, 1 Htr in each stitch across. 4Htr. The button is sewn onto this row.
FINISHING
Place the front panel over the back panel and sew the sides,that is sew row 11-23 on both sides.
Sew the buttom part together.
With 4.0 mm hook
Sc around the leg parts with Colour B
On the slanted side, with the wrong side facing you, rejoin yarn with Slst to the side of row 34
Row 1: Ch 2, 2 Htr in the space, 2 Htr to the top of row 33 continue all the way to the back at row 34
Row 2: Ch 2, turn, 3 Htr in the first stitch, 1 Htr in the next, 3dc in the next. Repeat all the way to the beginning of row 1, finish the last Htr with a Slst of Colour B
Row 3: Ch 1, turn, 1 Sc in each stitch across. Ch 1 and cut yarn.
Rejoin yarn to the Htr3tog of row 27 Ch 40, Sc in the second chain from the hook and in each chain across. Slst back to the Htr3tog space, Ch 1 and cut yarn.
Repeat same for back panel
Sc around the armhole where the button is with Colour A.
Make any applique of your choice and attach.
Sew the button to the last row of the back panel.
Weave in all ends.
FINISHED ROMPER
Disclaimer:
All patterns and pictures on this website is a property of Toyslab Creations. Please do not reprint, publish or post my patterns in whole or in part. Please don’t use my photos to advertise if you use my patterns to make and sell finished items.
Connect with me on Social Media