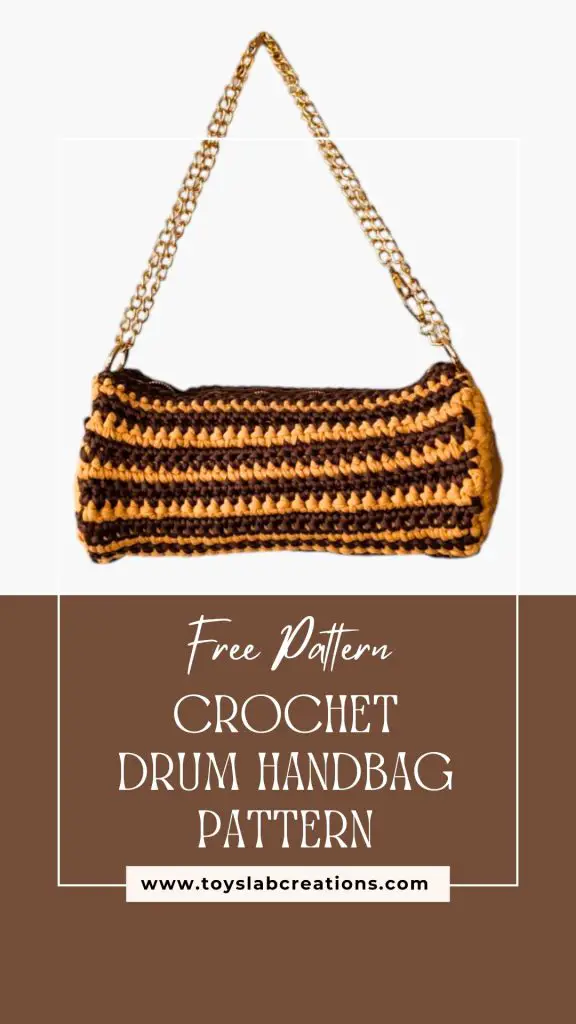
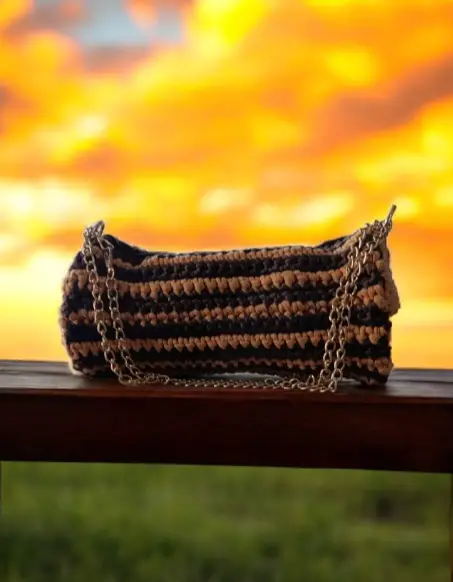
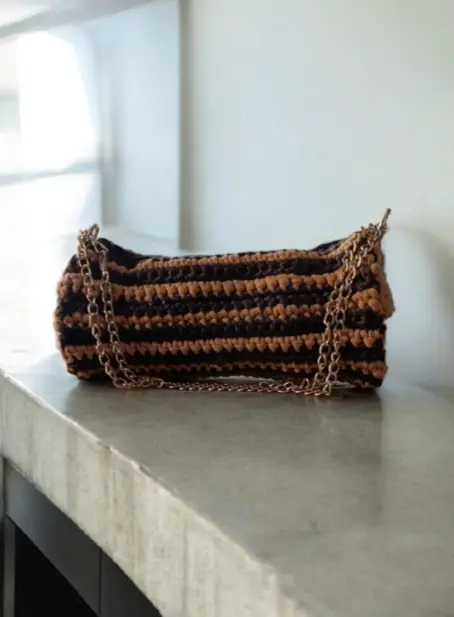
This crochet bag pattern has a cylindrical shape mimicking the African Gangan drum. It is a fun crochet bag to make with an unusual shape that is sure to earn sweet compliments.
DESIGN
The crochet drum bag pattern starts with the the circles which are made with the waistcoat stitch, they are then joined together row by row to go round the circle, the zipper, linen and accessories are attached and tada! The crochet drum bag is ready!
EASY
While this adorable crochet bag pattern might not be suitable for complete beginners, it’s a relatively easy crochet bag pattern once you get the hang of the waistcoat stitch.
FAST
This easy crochet bag pattern works up in no time, once you are done with the circle and they are joined as instructed, the bag is pretty much done, no extra parts are needed to be made to complete the bag.
MAKE IT YOUR OWN
I made the crochet drum bag in two colours, you can make yours in just one color or a multitude of colors, I’m sure it will turn out cute all the same
YARN
I used 180 yards of tshirt yarn for this project, you can use any brand of tshirt yarn available near you.
SIZE
This crochet bag pattern has only one sizing option, my bag measures 6 inches diameter for the circular part and the length in between the circles is 11 inches
This blog post contains instructions in both US and UK terms. If you’d like to support me, the ad-free printable PDF pattern is available for purchase on Ravelry, LoveCrafts, Ko-fi, and Etsy in both US and UK terms.
If you prefer to work with UK terms please scroll further down the page to view the UK version.
PDF PATTERN
If you prefer to work offline or if you would like to support my work, purchase the ad-free printable pdf version, including all photo tutorials on Ravelry, LoveCrafts, Ko-fi and Etsy shops.


Pin it for later here
Save this to your Ravelry favorites here
Check out these other free crochet patterns
CROCHET DRUM BAG | FREE PATTERN
Measurement
- Diameter of circle = 15cm / 6 inches
- Length of the bag = 28cm / 11 inches
Materials
T Shirt yarn – 180 yards
6.5 mm crochet hook
Scissors
Stitch markers
Zip
A pair O rings
Bag chain
Stitch Guide (US Version)
Ch: Chain
Wc: Waistcoat stitch
Sc: Single crochet
Slst: Slip stitch
Gauge:
10 stitches /10 rows= 10 cm/4 inch square in Sc
Pattern notes
The circle is worked in a spiral
I used two colors, you can use a color or more if you prefer.
Pattern Instructions
Make a magic ring
Round 1: Ch 1, 6 Sc into the ring. Do not join. 6 sc
Round 2: 2 Wc in the first stitch, 2 Wc in each stitch around. Do not join. 12 Wc.
Round 3: 2 Wc in the first stitch, 1 Wc in the next, 2 Wc in the next repeat around. Finish round with 1 Wc in the last stitch. Do not join. 18 Wc
Round 4: 1 Wc in the first 2 stitches, 2 Wc in the next stitch, 1 Wc in the next 2 stitches finish round with 2 Wc in the last stitch. Do not join. 24 Wc
Round 5: 2 Wc in the first stitch, 1 Wc in the next 3 stitches, 2 Wc in the next stitch finish round with 1 Wc in the last 3 stitches. Do not join. 30 Wc
Round 6: 1 Wc in the first 2 stitches, 2 Wc in the next stitch, 1 Wc in the next 4 stitches finish round with 2 Wc in the next stitch, 1 Wc in the last two stitches. Do not join. 36 Wc
Round 7: 1 Wc in the first 4 stitches, 2 Wc in the next stitch, 1 Wc in the next 5 stitches finish round with 2 Wc in the next stitch, 1 Wc in the last stitch. Do not join. 42 Wc
Cut yarn. Weave in end as shown in picture to close the circle.
Make a second one
Make a slst, insert in one of the circle,
Ch 28, connect to the second circle through the right side as shown in the picture below. (the wrong side of both circles are facing)
Row 1: Slst to the next stitch, Do not Ch 1, Sc into each chain across, Slst to the corresponding stitch on the other circle. 28 Sc.
Row 2: Slst to the next stitch, Do not Ch 1, Sc into each stitch across, connect to the other circle through the right side, Slst to the corresponding stitch. 28 Sc.
Row 3: Slst to the next stitch, Do not Ch 1, Sc into each stitch across, Slst to the corresponding stitch on the other circle. 28 Sc.
Row 4-41: Repeat rows 2 and 3
Note: I changed color every 3rd row, you can make your bag in one color, if you prefer to change color like I did, cut the old color at the end of the row and start the new row with the new color.
At the end of row 41, cut yarn and weave in all ends.
Cut linen to the size of the bag and attach zipper
Then sew or crochet to the bag
Attach O rings and chain.
Finished project
UK VERSION
CROCHET DRUM BAG | FREE PATTERN
Measurement
- Diameter of circle = 15cm / 6 inches
- Length of the bag = 28cm / 11 inches
Materials
T Shirt yarn – 180 yards
6.5 mm crochet hook
Scissors
Stitch markers
Zip
A pair O rings
Bag chain
Stitch Guide (UK Version)
Ch: Chain
Wc: Waistcoat stitch
Dc: Double crochet
Ss: Slip stitch
Gauge:
10 stitches /10 rows= 10 cm/4 inch square in Dc
Pattern notes
- The circle is worked in a spiral
- I used two colors, you can use a color or more if you prefer.
Pattern Instructions
Make a magic ring
Round 1: Ch 1, 6 Dc into the ring. Do not join. 6 Dc
Round 2: 2 Wc in the first stitch, 2 Wc in each stitch around. Do not join. 12 Wc.
Round 3: 2 Wc in the first stitch, 1 Wc in the next, 2 Wc in the next repeat around. Finish round with 1 Wc in the last stitch. Do not join. 18 Wc
Round 4: 1 Wc in the first 2 stitches, 2 Wc in the next stitch, 1 Wc in the next 2 stitches finish round with 2 Wc in the last stitch. Do not join. 24 Wc
Round 5: 2 Wc in the first stitch, 1 Wc in the next 3 stitches, 2 Wc in the next stitch finish round with 1 Wc in the last 3 stitches. Do not join. 30 Wc
Round 6: 1 Wc in the first 2 stitches, 2 Wc in the next stitch, 1 Wc in the next 4 stitches finish round with 2 Wc in the next stitch, 1 Wc in the last two stitches. Do not join. 36 Wc
Round 7: 1 Wc in the first 4 stitches, 2 Wc in the next stitch, 1 Wc in the next 5 stitches finish round with 2 Wc in the next stitch, 1 Wc in the last stitch. Do not join. 42 Wc
Cut yarn. Weave in end as shown in picture to close the circle.
Make a second one
Make a ss, insert in one of the circle,
Ch 28, connect to the second circle through the right side as shown in the picture below. (the wrong side of both circles are facing)
Row 1: ss to the next stitch, Do not Ch 1, Dc into each chain across, ss to the corresponding stitch on the other circle. 28 Dc.
Row 2: ss to the next stitch, Do not Ch 1, Dc into each stitch across, connect to the other circle through the right side, ss to the corresponding stitch. 28 Dc.
Row 3: ss to the next stitch, Do not Ch 1, Dc into each stitch across, ss to the corresponding stitch on the other circle. 28 Dc.
Row 4-41: Repeat rows 2 and 3
Note: I changed color every 3rd row, you can make your bag in one color, if you prefer to change color like I did, cut the old color at the end of the row and start the new row with the new color.
At the end of row 41, cut yarn and weave in all ends.
Cut linen to the size of the bag and attach zipper
Then sew or crochet to the bag
Attach O rings and chain.
Finished project
Disclaimer
All patterns and pictures on this Website is a property of Toyslab Creations. Please do not reprint, publish or post my patterns in whole or in part. Please don’t use my photos to advertise if you use my patterns to make and sell finished items.
Connect with me on Social Media