
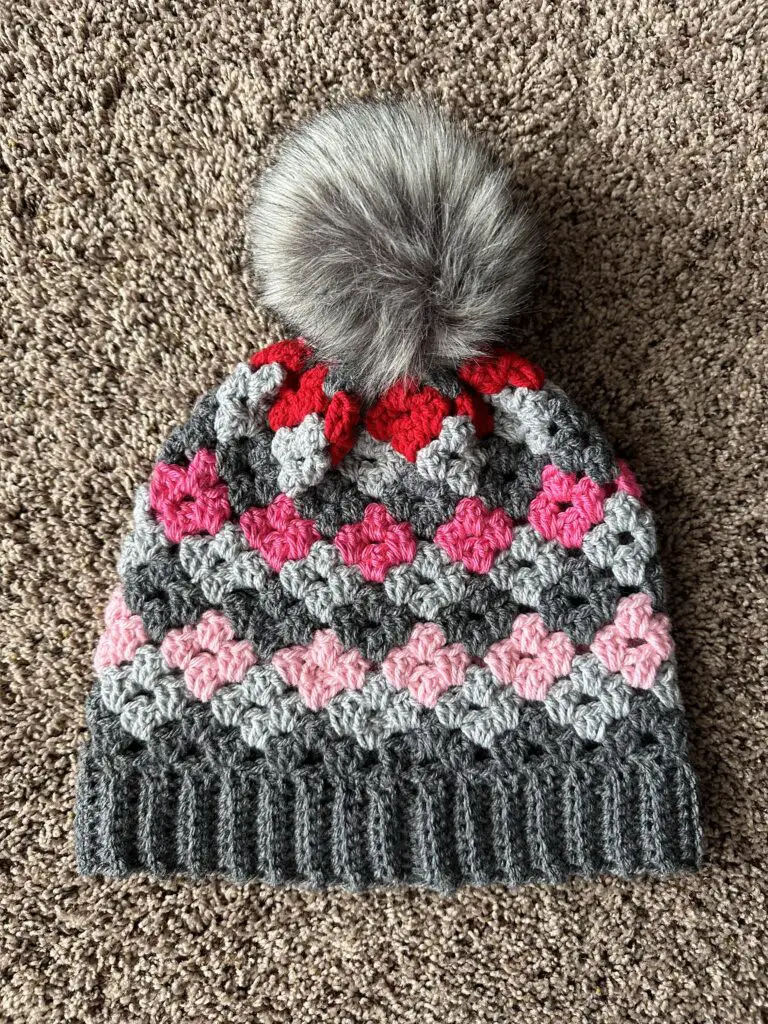
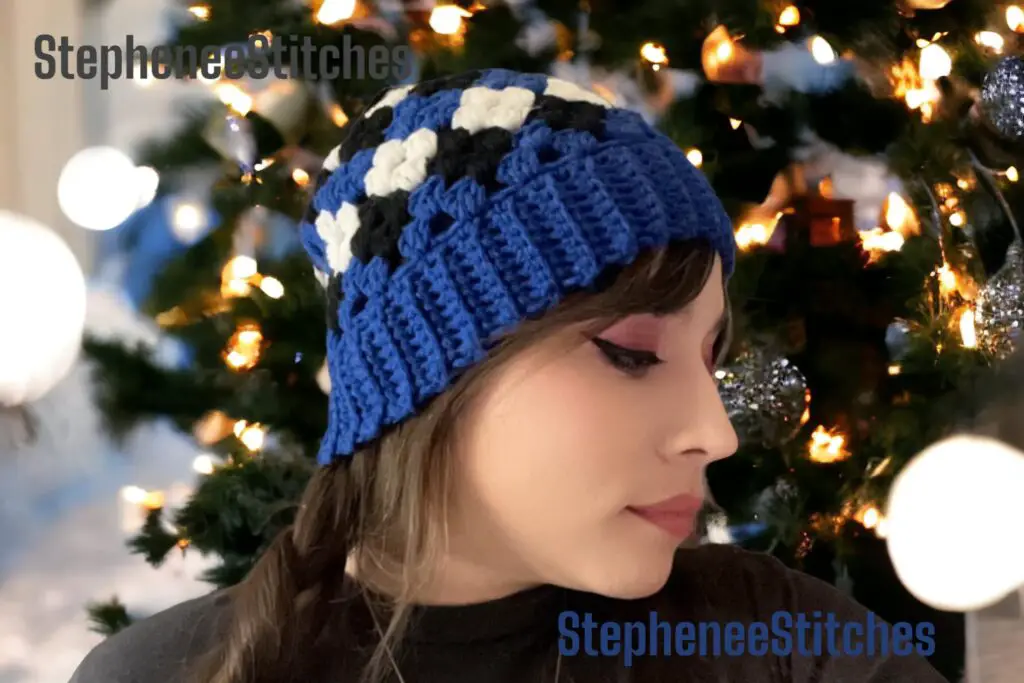
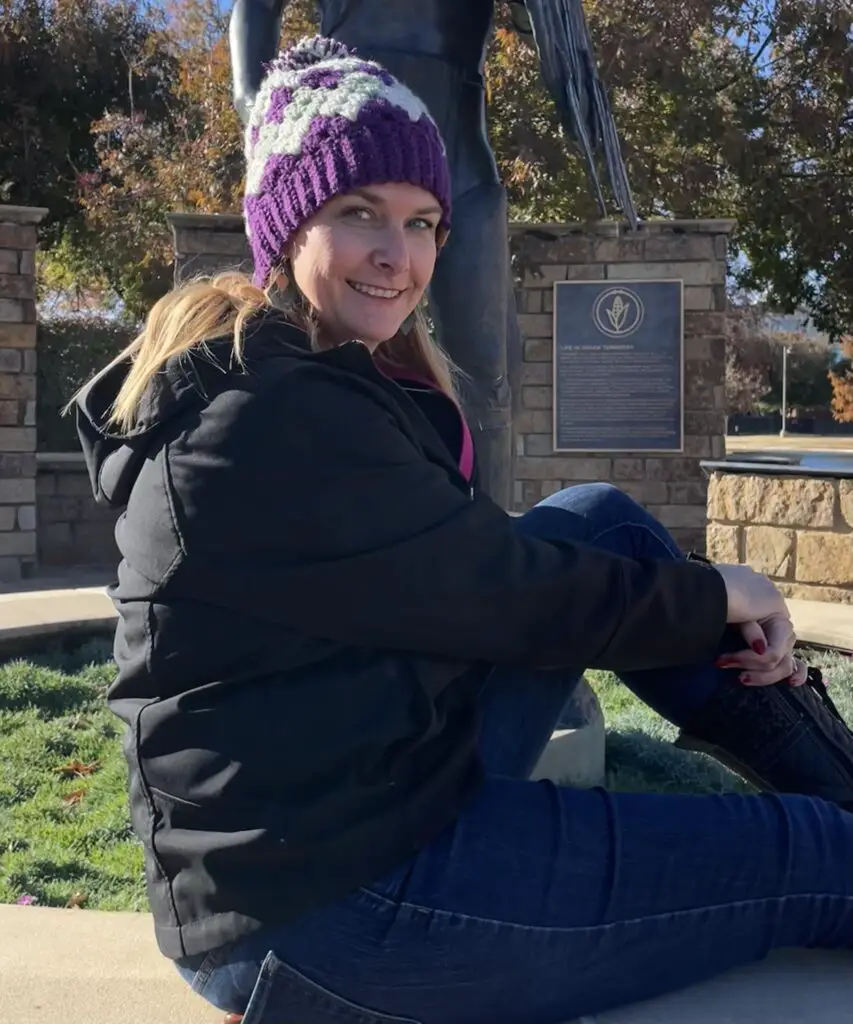
I felt the crochet granny diamond infinity scarf needed a beanie to match. The stunning crochet granny diamond beanie pattern features beautiful diamonds made just by changing colors while making the granny stitch. This easy-to-follow crochet hat pattern is perfect for crocheters who loves the granny stitch!
DESIGN
The Crochet granny diamond beanie is worked bottom up, starting from the band, which is worked in rows, then joined and then upper part is made, which is worked in the round. This easy crochet granny hat is very cozy and great for the winter weather.
EASY
Even as a beginner, if you are familiar with the crochet granny stitch and other basic crochet stitches such as single crochet, single crochet two together and slip stitch you can make the crochet granny diamond hat. It just has color changes which gets better ones you get the hang of it. Additionally, the downloadable PDF pattern offers five different sizing options.
YARN
The Crochet granny diamond beanie pattern uses worsted weight yarn . You can use any worsted weight yarn of your choice.
SIZES
The easy crochet granny hat pattern provides instructions for five different sizing options, including 0-3 months (6-12 months, 1-5 years, 6-10 years, teen/adult)
This blog post contains instructions for Size teen/adult. If you like to make it in smaller sizes or you desire to support my craft, the ad-free printable PDF pattern, that contains pictorial guides is available for purchase on Ravelry, LoveCrafts, Ko-fi, and Etsy.
If you prefer to work with UK terms please scroll further down the page to view the UK version.
PDF PATTERN
If you prefer to work offline or if you would like to support my work, purchase the ad-free printable pdf version, including all photo tutorials on Ravelry, LoveCrafts, Ko-fi and Etsy shops
PIN it for later here
Save this pattern to your Ravelry favourites here
You might also be interested in these other free crochet patterns
Knit look crochet ribbed scarf Pattern
Crochet Chevron headband Pattern
Easy crochet Adult Slipper Pattern
Easy Peasy Crochet Cowl Pattern
CROCHET GRANNY DIAMOND BEANIE | FREE PATTERN
Size
Teen/adult
Head Circumference (inches)22-24
Materials:
5.0 mm crochet hook
Worsted weight yarn – 150-200g
Colour A = 50g-100g
Colour B = 50g
Colour C =50g
Stitch marker (Optional)
Yarn needle
Difficulty:
Advanced Beginner
Gauge:
13 Sc stitches/10 Granny Stitch rows = 10 cm/4 inches
Stitch Guide (US Version)
Ch: Chain
Sc: Single Crochet
Scblo: Single crochet in back loops only
Sc2tog: Single crochet two together
Slst: Slip stitch
Dc: Double Crochet
Pattern notes
- Ch 1 at the beginning of the row does not count as a stitch
- Ch 3 at the beginning of the row counts as a stitch.
- The ribbing is worked flat
- The beanie is worked in rounds.
- Weave in your ends as you go to make the wrong side neater
Pattern Instructions:
With colour A
Ribbing
Ch 9
Row 1: Sc in the second chain from the hook and in each chain across. 8 sc
Row 2: Ch 1, turn. Scblo of the first stitch, Scblo of each stitch across. 8 sc
Row 3 – Row 66: Repeat row 2. 8 sc
Join the ribbing
Ch 1, turn, turn the ribbing inside out, Slst through the first and last rows of the ribbing all the way down. 8 stitches. Do not cut the yarn.
Turn the ribbing to the right side.
Round 1: Ch 1, Sc in the side of each row of ribbing all the way around. Finish the round with a slip stitch to the first stitch of the round. 66 Sc
Round 2: Ch 3, mark the third chain, 2 Dc in the first stitch, *Skip 2 stitches, 3 Dc in the next stitch* Repeat all the way around. Finish the round with a slip stitch in the first stitch of the round. Ch 1 and cut yarn. 22 A clusters
Round 3: With colour B,make a slip knot and attach the new yarn with a Slst to the next space. Ch 3, mark the third chain, 2 Dc in the same space, finish the last Dc with a slip stitch of colour A, *make 3 Dc in the next space, finish the last Dc with a slip stitch of colour B,make 3 Dc in the next space, finish the last Dc with a slip stitch of colour A* repeat all the way around. Finish the last Dc with a slst of colors B. Finish the round with a slip stitch in the first stitch of the round. Ch 1 and cut colour A. 11 B clusters, 11 A clusters
Round 4: With colour B, Slst in the next stitches to reach the next space between clusters. Ch 3, mark the third chain and make 2 more Dc in the same space, *3 Dc in the next cluster* Repeat all the way around. Finish the round with a slip stitch in the first stitch of the round. Ch 1 and cut yarn. 22 B clusters
Round 5: With colour C, make a slip knot and attach the new yarn with a Slst to the next space. Ch 3, mark the third chain, 2 Dc in the same space, finish the last Dc with a slip stitch of colour B, *make 3 Dc in the next space, finish the last Dc with a slip stitch of colour C,make 3 Dc in the next space, finish the last Dc with a slip stitch of colour B* repeat all the way around. Finish the last Dc with a slst of colour C. Finish the round with a slip stitch in the first stitch of the round. Ch 1 and cut colour B. 11 C clusters, 11 B clusters
Round 6: With colour C, Slst in the next stitches to reach the next space between clusters. Ch 3, mark the third chain and make 2 more Dc in the same space, *3 Dc in the next cluster* Repeat all the way around. Finish the round with a slip stitch in the first stitch of the round. Ch 1 and cut yarn. 22 C clusters
Round 7: With colour A, make a slip knot and attach the new yarn with a Slst to the next space. Ch 3, mark the third chain, 2 Dc in the same space, finish the last Dc with a slip stitch of colour C, *make 3 Dc in the next space, finish the last Dc with a slip stitch of colour A,make 3 Dc in the next space, finish the last Dc with a slip stitch of colour C* repeat all the way around. Finish the last Dc with a slst of colour A. Finish the round with a slip stitch in the first stitch of the round. Ch 1 and cut colour C. 11 A clusters, 11 C clusters
Round 8: With colour A, Slst in the next stitches to reach the next space between clusters. Ch 3, mark the third chain and make 2 more Dc in the same space, *3 Dc in the next cluster* Repeat all the way around. Finish the round with a slip stitch in the first stitch of the round. Ch 1 and cut yarn. 22 A clusters
Round 9: Repeat round 3
Round 10: Repeat round 4
Round 11: Repeat round 5
Round 12: Repeat round 6
Round 13: Repeat round 7
Round 14: Repeat round 8
Round 15: Repeat round 3
Round 16: Repeat round 4
Round 17: With colour A, make a slip knot and attach the new yarn with a slst to the first stitch of the round. Ch 1, Sc into each stitch across. Finish the round with a slst to the first stitch of the round. 66 Sc
Round 18: Ch 1, Sc2tog all the way across. Finish the round with a slst to the first stitch of the round. 33 Sc. Ch 1, leave a long tail and cut yarn.
Finishing
With a tapestry needle, close the top of the hat.
Attach a pompom if you prefer.
Weave in all ends.
Finished Project
UK Version
Size
Teen/adult
Head Circumference (inches)22-24
Materials:
5.0 mm crochet hook
Worsted weight yarn – 150-200g
Colour A = 50g-100g
Colour B = 50g
Colour C =50g
Stitch marker (Optional)
Yarn needle
Difficulty:
Advanced Beginner
Gauge:
13 Dc stitches/10 Granny Stitch rows = 10 cm/4 inches
Stitch Guide (US Version)
Ch: Chain
Dc: Double Crochet
Dcblo: Double crochet in back loops only
Dc2tog: Double crochet two together
Slst: Slip stitch
Tr: Treble Crochet
Pattern notes
- Ch 1 at the beginning of the row does not count as a stitch
- Ch 3 at the beginning of the row counts as a stitch.
- The ribbing is worked flat
- The beanie is worked in rounds.
- Weave in your ends as you go to make the wrong side neater
Pattern Instructions:
With colour A
Ribbing
Ch 9
Row 1: Dc in the second chain from the hook and in each chain across. 8 Dc
Row 2: Ch 1, turn. Dcblo of the first stitch, Dcblo of each stitch across. 8 Dc
Row 3 – Row 66: Repeat row 2. 8 Dc
Join the ribbing
Ch 1, turn, turn the ribbing inside out, Slst through the first and last rows of the ribbing all the way down. 8 stitches. Do not cut the yarn.
Turn the ribbing to the right side.
Round 1: Ch 1, Dc in the side of each row of ribbing all the way around. Finish the round with a slip stitch to the first stitch of the round. 66 Dc
Round 2: Ch 3, mark the third chain, 2 Tr in the first stitch, *Skip 2 stitches, 3 Tr in the next stitch* Repeat all the way around. Finish the round with a slip stitch in the first stitch of the round. Ch 1 and cut yarn. 22 A clusters
Round 3: With colour B,make a slip knot and attach the new yarn with a Slst to the next space. Ch 3, mark the third chain, 2 Tr in the same space, finish the last Tr with a slip stitch of colour A, *make 3 Tr in the next space, finish the last Tr with a slip stitch of colour B,make 3 Tr in the next space, finish the last Tr with a slip stitch of colour A* repeat all the way around. Finish the last Tr with a slst of colors B. Finish the round with a slip stitch in the first stitch of the round. Ch 1 and cut colour A. 11 B clusters, 11 A clusters
Round 4: With colour B, Slst in the next stitches to reach the next space between clusters. Ch 3, mark the third chain and make 2 more Tr in the same space, *3 Tr in the next cluster* Repeat all the way around. Finish the round with a slip stitch in the first stitch of the round. Ch 1 and cut yarn. 22 B clusters
Round 5: With colour C, make a slip knot and attach the new yarn with a Slst to the next space. Ch 3, mark the third chain, 2 Tr in the same space, finish the last Tr with a slip stitch of colour B, *make 3 Tr in the next space, finish the last Tr with a slip stitch of colour C,make 3 Tr in the next space, finish the last Tr with a slip stitch of colour B* repeat all the way around. Finish the last Tr with a slst of colour C. Finish the round with a slip stitch in the first stitch of the round. Ch 1 and cut colour B. 11 C clusters, 11 B clusters
Round 6: With colour C, Slst in the next stitches to reach the next space between clusters. Ch 3, mark the third chain and make 2 more Tr in the same space, *3 Tr in the next cluster* Repeat all the way around. Finish the round with a slip stitch in the first stitch of the round. Ch 1 and cut yarn. 22 C clusters
Round 7: With colour A, make a slip knot and attach the new yarn with a Slst to the next space. Ch 3, mark the third chain, 2 Tr in the same space, finish the last Tr with a slip stitch of colour C, *make 3 Tr in the next space, finish the last Tr with a slip stitch of colour A,make 3 Tr in the next space, finish the last Tr with a slip stitch of colour C* repeat all the way around. Finish the last Tr with a slst of colour A. Finish the round with a slip stitch in the first stitch of the round. Ch 1 and cut colour C. 11 A clusters, 11 C clusters
Round 8: With colour A, Slst in the next stitches to reach the next space between clusters. Ch 3, mark the third chain and make 2 more Tr in the same space, *3 Tr in the next cluster* Repeat all the way around. Finish the round with a slip stitch in the first stitch of the round. Ch 1 and cut yarn. 22 A clusters
Round 9: Repeat round 3
Round 10: Repeat round 4
Round 11: Repeat round 5
Round 12: Repeat round 6
Round 13: Repeat round 7
Round 14: Repeat round 8
Round 15: Repeat round 3
Round 16: Repeat round 4
Round 17: With colour A, make a slip knot and attach the new yarn with a slst to the first stitch of the round. Ch 1, Dc into each stitch across. Finish the round with a slst to the first stitch of the round. 66 Dc
Round 18: Ch 1, Dc2tog all the way across. Finish the round with a slst to the first stitch of the round. 33 Dc. Ch 1, leave a long tail and cut yarn.
Finishing
With a tapestry needle, close the top of the hat.
Attach a pompom if you prefer.
Weave in all ends.
Finished Project
Disclaimer
All patterns and pictures on this Website is a property of Toyslab Creations. Please do not reprint, publish or post my patterns in whole or in part. Please don’t use my photos to advertise if you use my patterns to make and sell finished items.
Connect with me on Social Media
 Please wait...