
This post may contain affiliate links. This means that if you make a purchase from those links I receive a commission at no additional cost to you. Thank you for continued support!
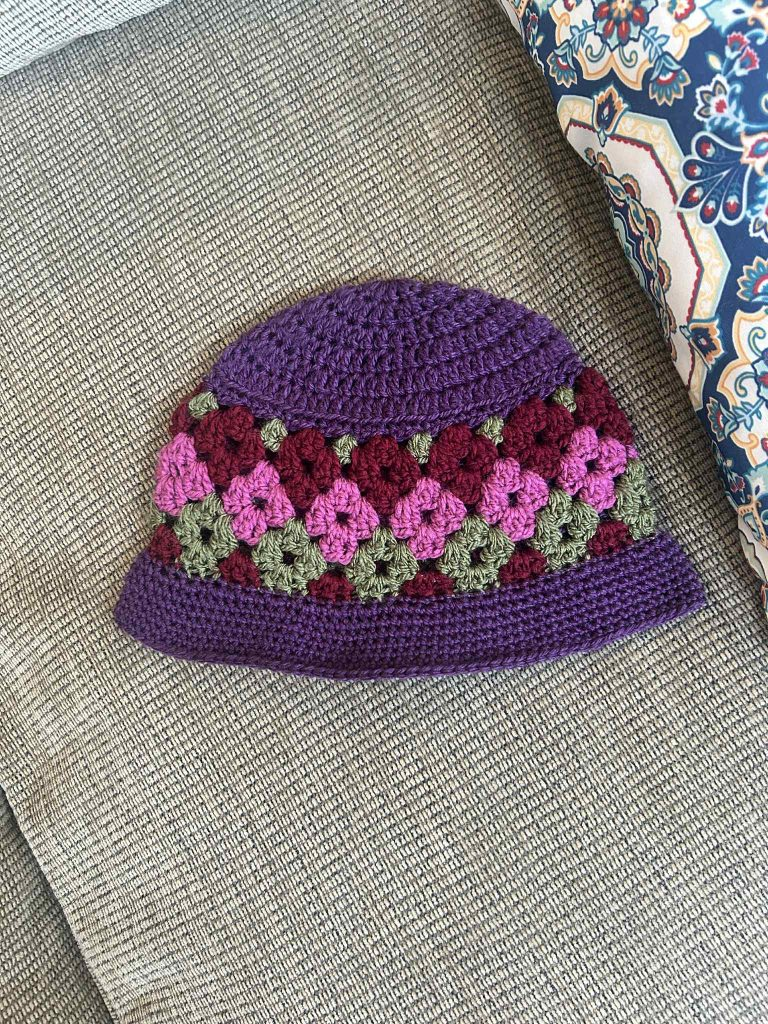
The crochet granny diamond bucket hat is a simple yet elegant crochet bucket hat pattern. It’s a very simple pattern with clear instructions and it works up in no time. Being colorful also makes it eye catching and beautiful. Perfect for spring and summer.
DESIGN
The easy crochet granny bucket hat is worked top down starting with rounds of double crochet before the granny diamond rows are made and then ends with the rows of brim
ADORABLE
This adorable crochet granny diamond bucket hat is so colorful and eye-catching and give your face the protection it needs from the sun.
EASY
This granny diamond bucket hat is a quick and easy crochet bucket hat pattern. It works up pretty fast and perfect for scrap yarns. It also has a good fit.
YARN
I used Dk weight yarn in four complementary color for this crochet granny bucket hat. You can make yours in the same fashion with your preferred colors. I’m sure it will turn out beautiful and colorful.
SIZE
The crochet granny diamond bucket hat is made in just one that fits adults.
Read on to find the free crochet granny diamond bucket hat pattern below or find the ad-free printable PDF version on Ravelry, Love Crafts, Ko-fi and Etsy.
If you prefer to work with UK terms please scroll further down the page to view the UK version
PDF PATTERN
If you prefer to work offline or if you would like to support my work, purchase the ad-free printable pdf version, including all photo tutorials on Ravelry, Love Crafts, Ko-fi and Etsy.
Purchase the Ad-free PDF pattern


PIN it for later here

Save this pattern to your Ravelry favourite here
Check out this other free crochet patterns
https://toyslabcreations.com/crochet-granny-square-pillow-free-pattern
https://toyslabcreations.com/crochet-granny-diamond-blanket-free-pattern
CROCHET GRANNY DIAMOND BUCKET HAT | FREE PATTERN
Materials:
4.5 mm crochet hook
DK weight yarn – 200g
Colour A = 50g
Colour B = 50g
Colour C = 50g
Colour D = 50g
Stitch marker
Yarn needle
Difficulty:
Advanced Beginner
Gauge:
16 stitches/8 rows = 10 cm/4 inches in Dc
Stitch Guide (US Version)
Ch: Chain
Sc: Single Crochet
Slst: Slip stitch
Dc: Double Crochet
Scblo: Single crochet back loops only
Scflo: Single crochet front loops only
Pattern notes
- Ch 1 or Ch 2 at the beginning of the round does not count as a stitch.
- Ch 3 at the beginning of the round counts as a stitch. .
- Weave in your ends as you go to make the wrong side neater.
- Leave a moderately long tail at the end of the odd rounds, to use on the next round, to reduce the number of ends to weave in (join yarn along the way if the tail isn’t long enough to finish the next round)
- You can add more rounds of Sc or more rounds of granny diamond stitch if you prefer to add more depth to your hat.
Pattern Instructions:
With colour A
Make a magic circle,
Round 1: Make a magic ring, Ch 2, make 1 Dc into the magic ring , mark stitch, work additional 11 Dc in the ring. Finish the round with a slst to the 1st Dc. (12 Dc)
Round 2: Ch 2, 2 Dc in the first stitch and in each stitch across. Finish the round with a slst to the 1st Dc. (24 Dc)
Round 3: Ch 2, 2 Dc in the first stitch, *1Dc in the next stitch, 2 Dc in the next stitch * repeat till the end of round. 1 Dc in each in the last stitch. Finish the round with a slst to the 1st Dc. (36 Dc)
Round 4: Ch 2, 2 Dc in the first stitch, *1Dc in the next two stitches, 2 Dc in the next stitch * repeat till the end of round. 1 Dc in each of the last two stitches. Finish the round with a slst to the 1st Dc. (48 Dc)
Round 5: Ch 2, 2 Dc in the first stitch, *1Dc in the next three stitches, 2 Dc in the next stitch * repeat till the end of round. 1 Dc in each of the last three stitches. Finish the round with a slst to the 1st Dc. (60 Dc)
Round 6: Ch 2, 2 Dc in the first stitch, *1Dc in the next four stitches, 2 Dc in the next stitch * repeat till the end of round. 1 Dc in each of the last four stitches. Finish the round with a slst to the 1st Dc. (72 Dc)
Round 7: Ch 1, Scblo in the first stitch, Scblo in each stitch around. Finish the round with a slst to the first stitch of the round. (72 Sc). Ch 1 and cut yarn.
Round 8: With Colour B, make a slip knot and attached the new yarn with a slst to the first stitch of the round, Ch 3, mark the third chain, 2 Dc in the first stitch, finish the last Dc with a slst of Colour C. Skip 2 stitches, 3 Dc in the next stitch, finish the last Dc with a slst of Colour B, Skip 2 stitches, 3 Dc in the next stitch, finish the last Dc with a slst of Colour C, Skip 2 stitches, 3 Dc in the next stitch, finish the last Dc with a slst of Colour B Repeat all the way around.Finish the last Dc with a slst of colour B. Finish the round with a slip stitch in the first stitch of the round. Cut colour C. 12 B clusters, 12 clusters.
Round 9: With Colour B, Slst in the next stitches to reach the next space between clusters. Ch 3, mark the third chain and make 2 more Dc in the same space, 3 Dc in the next space Repeat all the way around. Finish the round with a slip stitch in the first stitch of the round. Ch 1 and cut yarn, Leave a long tail. (Carry the yarn along to use on the next round). 24 B clusters
Round 10: With colour D, make a slip knot and attach the new yarn with a Slst to the next space. Ch 3, mark the third chain, 2 Dc in the same space, finish the last Dc with a slip stitch of colour B, make 3 Dc in the next space, finish the last Dc with a slip stitch of colour D ,make 3 Dc in the next space, finish the last Dc with a slip stitch of colour B repeat all the way around. Finish the last Dc with a slst of colour D. Finish the round with a slip stitch in the first stitch of the round. Ch 1 and cut colour B. 12 D clusters, 12 B clusters
Round 11: With Colour D, Slst in the next stitches to reach the next space between clusters. Ch 3, mark the third chain and make 2 more Dc in the same space, 3 Dc in the next space Repeat all the way around. Finish the round with a slip stitch in the first stitch of the round. Ch 1 and cut yarn, Leave a long tail. (Carry the yarn along to use on the next round). 24 D clusters
Round 12: With colour C, make a slip knot and attach the new yarn with a Slst to the next space. Ch 3, mark the third chain, 2 Dc in the same space, finish the last Dc with a slip stitch of colour D, make 3 Dc in the next space, finish the last Dc with a slip stitch of colour C ,make 3 Dc in the next space, finish the last Dc with a slip stitch of colour D repeat all the way around. Finish the last Dc with a slst of colour C. Finish the round with a slip stitch in the first stitch of the round. Ch 1 and cut colour D. 12 C clusters, 12 D clusters.
Round 13: With Colour C, Slst in the next stitches to reach the next space between clusters. Ch 3, mark the third chain and make 2 more Dc in the same space, 3 Dc in the next space Repeat all the way around. Finish the round with a slip stitch in the first stitch of the round. Ch 1 and cut yarn, Leave a long tail. (Carry the yarn along to use on the next round). 24 C clusters
Round 14: With colour B, make a slip knot and attach the new yarn with a Slst to the next space. Ch 3, mark the third chain, 2 Dc in the same space, finish the last Dc with a slip stitch of colour C, make 3 Dc in the next space, finish the last Dc with a slip stitch of colour B ,make 3 Dc in the next space, finish the last Dc with a slip stitch of colour C repeat all the way around. Finish the last Dc with a slst of colour B. Finish the round with a slip stitch in the first stitch of the round. Ch 1 and cut both yarns. 12 B clusters, 12 C clusters.
Round 15: Ch 1, Scflo in the first stitch, Scflo in each stitch around. Finish the round with a slst to the first stitch of the round. (72 Sc).
Round 16: Ch 1, 2 Sc in the first stitch, Sc in the next stitch, 2 Sc in the next stitch, Sc in the next stitch Repeat around. Finish the round with a slst to the first stitch of the round. 108 Sc
Round 17: Ch 1, Sc in the first stitch, Sc in each stitch around. Finish the round with a slst to the first stitch of the round. (108 Sc).
Round 18-22: Repeat round 17 Ch 1 and cut yarn.
Make more rounds if you prefer a longer brim.
Finishing
Weave in all ends.
Finished Project
UK VERSION
CROCHET GRANNY DIAMOND BUCKET HAT | FREE PATTERN
Materials:
4.5 mm crochet hook
DK weight yarn – 200g
Colour A = 50g
Colour B = 50g
Colour C = 50g
Colour D = 50g
Stitch marker
Yarn needle
Difficulty:
Advanced Beginner
Gauge:
16 stitches/8 rows = 10 cm/4 inches in Tr
Stitch Guide (UK Version)
Ch: Chain
Dc: Double Crochet
SS: Slip stitch
Tr: Treble Crochet
Dcblo: Double crochet back loops only
Dcflo: Double crochet front loops only
Pattern notes
- Ch 1 or Ch 2 at the beginning of the round does not count as a stitch.
- Ch 3 at the beginning of the round counts as a stitch. .
- Weave in your ends as you go to make the wrong side neater.
- Leave a moderately long tail at the end of the odd rounds, to use on the next round, to reduce the number of ends to weave in (join yarn along the way if the tail isn’t long enough to finish the next round)
- You can add more rounds of Dc or more rounds of granny diamond stitch if you prefer to add more depth to your hat.
Pattern Instructions:
With colour A
Make a magic circle,
Round 1: Make a magic ring, Ch 2, make 1 Tr into the magic ring , mark stitch, work additional 11 Tr in the ring. Finish the round with a SS to the 1st Tr. (12 Tr)
Round 2: Ch 2, 2 Tr in the first stitch and in each stitch across. Finish the round with a SS to the 1st Tr. (24 Tr)
Round 3: Ch 2, 2 Tr in the first stitch, *1Tr in the next stitch, 2 Tr in the next stitch * repeat till the end of round. 1 Tr in each in the last stitch. Finish the round with a SS to the 1st Tr. (36 Tr)
Round 4: Ch 2, 2 Tr in the first stitch, *1Tr in the next two stitches, 2 Tr in the next stitch * repeat till the end of round. 1 Tr in each of the last two stitches. Finish the round with a SS to the 1st Tr. (48 Tr)
Round 5: Ch 2, 2 Tr in the first stitch, *1Tr in the next three stitches, 2 Tr in the next stitch * repeat till the end of round. 1 Tr in each of the last three stitches. Finish the round with a SS to the 1st Tr. (60 Tr)
Round 6: Ch 2, 2 Tr in the first stitch, *1Tr in the next four stitches, 2 Tr in the next stitch * repeat till the end of round. 1 Tr in each of the last four stitches. Finish the round with a SS to the 1st Tr. (72 Tr)
Round 7: Ch 1, Dcblo in the first stitch, Dcblo in each stitch around. Finish the round with a SS to the first stitch of the round. (72 Dc). Ch 1 and cut yarn.
Round 8: With Colour B, make a slip knot and attached the new yarn with a SS to the first stitch of the round, Ch 3, mark the third chain, 2 Tr in the first stitch, finish the last Tr with a SS of Colour C. Skip 2 stitches, 3 Tr in the next stitch, finish the last Tr with a SS of Colour B, Skip 2 stitches, 3 Tr in the next stitch, finish the last Tr with a SS of Colour C, Skip 2 stitches, 3 Tr in the next stitch, finish the last Tr with a SS of Colour B Repeat all the way around.Finish the last Tr with a SS of colour B. Finish the round with a slip stitch in the first stitch of the round. Cut colour C. 12 B clusters, 12 clusters.
Round 9: With Colour B, SS in the next stitches to reach the next space between clusters. Ch 3, mark the third chain and make 2 more Tr in the same space, 3 Tr in the next space Repeat all the way around. Finish the round with a slip stitch in the first stitch of the round. Ch 1 and cut yarn, Leave a long tail. (Carry the yarn along to use on the next round). 24 B clusters
Round 10: With colour D, make a slip knot and attach the new yarn with a SS to the next space. Ch 3, mark the third chain, 2 Tr in the same space, finish the last Tr with a slip stitch of colour B, make 3 Tr in the next space, finish the last Tr with a slip stitch of colour D ,make 3 Tr in the next space, finish the last Tr with a slip stitch of colour B repeat all the way around. Finish the last Tr with a SS of colour D. Finish the round with a slip stitch in the first stitch of the round. Ch 1 and cut colour B. 12 D clusters, 12 B clusters
Round 11: With Colour D, SS in the next stitches to reach the next space between clusters. Ch 3, mark the third chain and make 2 more Tr in the same space, 3 Tr in the next space Repeat all the way around. Finish the round with a slip stitch in the first stitch of the round. Ch 1 and cut yarn, Leave a long tail. (Carry the yarn along to use on the next round). 24 D clusters
Round 12: With colour C, make a slip knot and attach the new yarn with a SS to the next space. Ch 3, mark the third chain, 2 Tr in the same space, finish the last Tr with a slip stitch of colour D, make 3 Tr in the next space, finish the last Tr with a slip stitch of colour C ,make 3 Tr in the next space, finish the last Tr with a slip stitch of colour D repeat all the way around. Finish the last Tr with a SS of colour C. Finish the round with a slip stitch in the first stitch of the round. Ch 1 and cut colour D. 12 C clusters, 12 D clusters.
Round 13: With Colour C, SS in the next stitches to reach the next space between clusters. Ch 3, mark the third chain and make 2 more Tr in the same space, 3 Tr in the next space Repeat all the way around. Finish the round with a slip stitch in the first stitch of the round. Ch 1 and cut yarn, Leave a long tail. (Carry the yarn along to use on the next round). 24 C clusters
Round 14: With colour B, make a slip knot and attach the new yarn with a SS to the next space. Ch 3, mark the third chain, 2 Tr in the same space, finish the last Tr with a slip stitch of colour C, make 3 Tr in the next space, finish the last Tr with a slip stitch of colour B ,make 3 Tr in the next space, finish the last Tr with a slip stitch of colour C repeat all the way around. Finish the last Tr with a SS of colour B. Finish the round with a slip stitch in the first stitch of the round. Ch 1 and cut both yarns. 12 B clusters, 12 C clusters.
Round 15: Ch 1, Dcflo in the first stitch, Dcflo in each stitch around. Finish the round with a SS to the first stitch of the round. (72 Dc).
Round 16: Ch 1, 2 Dc in the first stitch, Dc in the next stitch, 2 Dc in the next stitch, Dc in the next stitch Repeat around. Finish the round with a SS to the first stitch of the round. 108 Dc
Round 17: Ch 1, Dc in the first stitch, Dc in each stitch around. Finish the round with a SS to the first stitch of the round. (108 Dc).
Round 18-22: Repeat round 17 Ch 1 and cut yarn.
Make more rounds if you prefer a longer brim.
Finishing
Weave in all ends.
Finished Project

Disclaimer
All patterns and pictures on this Website is a property of Toyslab Creations. Please do not reprint, publish or post my patterns in whole or in part. Please don’t use my photos to advertise if you use my patterns to make and sell finished items.
Connect with me on Social Media