This post may contain affiliate links. This means that if you make a purchase from those links I receive a commission at no additional cost to you. Thank you for continued support!
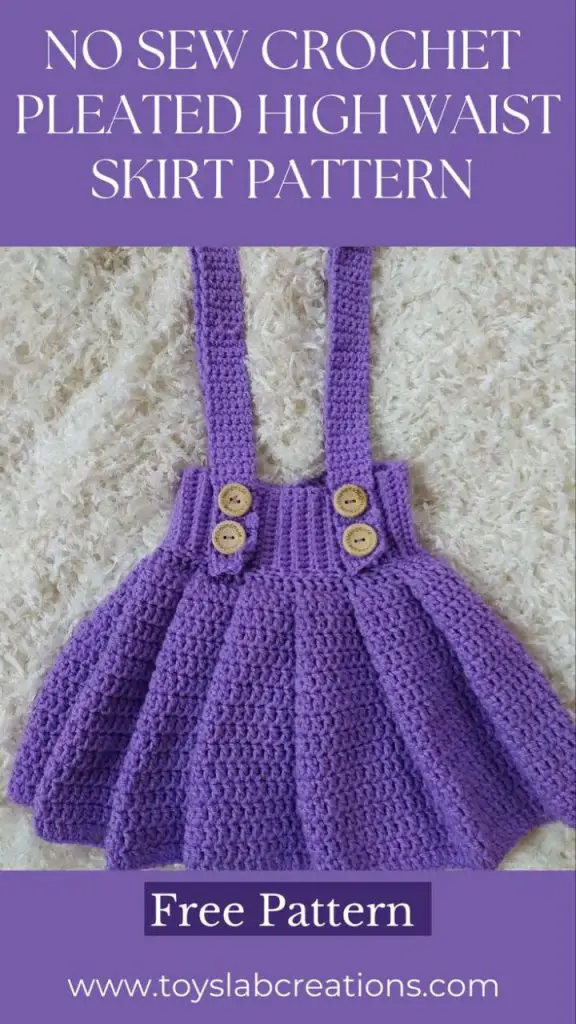
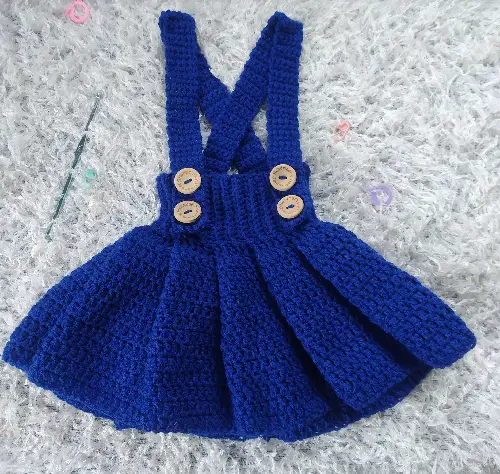
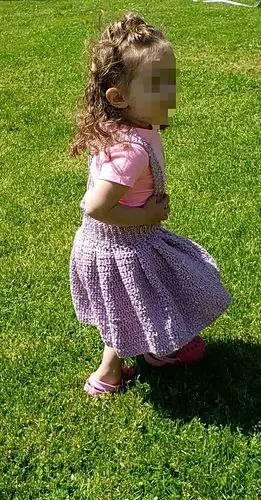
This simple crochet baby pleated high waist skirt has been designed in such a way that you do not need a tapestry needle to sew the pleats in place. And the end result is superb. You can decide to add suspenders or not.
With this pattern, you can make cute crochet pleated high waist baby skirt. This crochet pleated high waist skirt pattern will be a great for baby shower gifts and newborn gifts.
DESIGN
The pleated crochet high waist skirt is worked bottom up, once the length of the skirt is reached, the pleats are made with no sewing required, then the ribbed waist band is made and finally the suspenders are made and the crochet pleated skirt is all done.
EASY
This easy crochet baby skirt pattern is quite easy to make. It uses mainly the double crochet and single crochet stitches. The pleats part is quite easy to make and there is a video tutorial to make it easier to understand
NO SEW PLEATS
You don’t have to worry about sewing the pleats it place. The pleats are made as you crochet along, making it easier and even.
YARN
I used Dk weight yarn for this project, you can use Dk weight yarn or worsted weight yarn for this easy crochet skirt pattern. The crochet baby skirt pattern was made in just one color but you can be creative with how you want to mix the colors.
SIZE
In this blog post you will find the instructions for the 0-6 months size of this crochet high waist pleated skirt pattern. But the written PDF pattern contains 8 sizing options from 0-6 months up to 10 years.
Read on to find the free crochet pattern for size 0-6 months size below or find the ad-free printable PDF version on Ravelry, Love Crafts and Etsy.
If you prefer to work with UK terms please scroll further down the page to view the UK version.
Video Tutorial
If you prefer video tutorials, you can watch the video tutorial for this crochet pleated high waist baby girl skirt above.
Also watch more crochet video tutorials of my patterns on my YouTube channel. Subscribe and turn on notifications so you won’t miss any of my future videos. Happy crocheting!
PDF PATTERN
If you prefer to work offline or if you would like to support my work or you want to make the pattern in bigger sizes, purchase the ad-free printable PDF version, including all photo tutorials on Ravelry, Love Crafts and Etsy.
Purchase the Ad-Free PDF below


PIN it for later here
Save this pattern to your Ravelry favourites here
Check Out These Other Free Crochet Patterns
US VERSION
CROCHET PLEATED HIGH WAIST BABY SKIRT | FREE PATTERN
Waist Measurement (inches)
19
Skirt Length (inches)
7
Materials
Dk or Worsted weight yarn
5.0 mm crochet hook
Scissors
Stitch markers
Stitches (US Version)
Ch: Chain
Dc: Double crochet
Slst: Slip stitch
Sc: Single Crochet
Scblo: Single Crochet in back loops only
Gauge:
13 stitches /7.5 rows= 10 cm/4 inch square in Dc
Pattern notes
- Ch 2 at the beginning of the round does not count as a stitch
- Ch 1 at the beginning of the row (for the ribbed part) does not count as a stitch.
- The skirt length measurement above does not include the high waist (ribbed part)
- The suspenders is crossed
Pattern instructions
Ch 165 join in the round with a Slst. Make sure the chain is not twisted.
Round 1: Ch 2, Dc in the first chain and into each chain around. Finish round with a Slst to first Dc. 165 stitches.
Round 2: Ch 2, Dc in the first stitch and into each stitch around. Finish round with a Slst to first Dc. 165 stitches.
Round 3 – Round 13: repeat round 2.
Round 14: Ch 2, Yarn over, insert your hook through the 1st stitch, then through the 10th and 11th stitch, yarn over and pull through all three stitches and complete the first Dc.
Yarn over, insert your hook through the 2nd stitch, then through the 9th and 12th stitch, yarn over and pull through all three stitches and complete the second Dc.
Yarn over, insert your hook through the 3rd stitch, then through the 8th and 13th stitch, yarn over and pull through all three stitches and complete the third Dc.
Yarn over, insert your hook through the 4th stitch, then through the 7th and 14th stitch, yarn over and pull through all three stitches and complete the fourth Dc.
Yarn over, insert your hook through the 5th stitch, then through the 6th and 15th stitch, yarn over and pull through all three stitches and complete the fifth Dc.
Continue around. Finish round with a Slst to the top to the first stitch. At the end of the round, you should have 55 stitches. At this point you should have 11 pleats.
Ribbed Part
Row 1:Ch 14 Sc in the second Ch from hook, Sc in the remaining chains. 13 Sc. Skip the first stitch and Slst to the 2nd stitch on the skirt.
Row 2: Turn. Do not Ch 1.Sc in BLO of each of the 13 Sc from previous row.
Row 3: Ch 1, turn. Sc in BLO in each of the 13 Sc from previous row. Skip a stitch then Slst into the next stitch on the skirt
Row 4-55: repeat rows 2 and 3. Finish with a repeat of row 3. Ch 1 and cut yarn.
Sew the first row to the last row. If you don’t want to add suspenders, just weave in your ends.
If you want to add suspenders note the first and last rows. So you know where to start counting stitches for the suspenders
Suspenders
Row 1:Skip 4 from the first row of rib. reattach yarn with a slip knot to the next stitch, Ch 1 to secure, Sc into same stitch and into the next 4 stitches. (5 Sc)
Row 2: Ch 1, turn. Sc in the first stitch and in each stitch across. (5 Sc)
Row 3- 56 repeat row 2
Row 57: Ch 1, turn. Sc in the first stitch, Ch 3, skip 3, Sc into the last stitch (5 stitches)
Row 58: Ch 1, turn. Sc in the first stitch, Sc 3 into the Ch 3 space, Sc into the last stitch. (5 Sc )
Row 59: Ch 1, turn. Sc in the first stitch and in each stitch across. (5 Sc)
Row 60: Ch 1, turn. Sc in the first stitch and in each stitch across. (5 Sc)
Row 61: Ch 1, turn. Sc in the first stitch, Ch 3, skip 3, Sc into the last stitch (5 stitches)
Row 62: Ch 1, turn. Sc in the first stitch, Sc 3 into the Ch 3 space, Sc into the last stitch. (5 Sc)
Row 63: Ch 1, turn. Sc in the first stitch and in each stitch across. (5 Sc)
Row 64: Ch 1, turn. Sc in the first stitch and in each stitch across. (5 Sc). Ch 1 and cut yarn
Repeat for the second suspender on the other end
Buttons
To fix the Button count 11 from the strap, and attach the button to the next stitch, leave about a inch in between and attach the other button below the first one. Repeat same for the other strap.
Finishing
Weave in all ends.
FINISHED PROJECT
UK VERSION
CROCHET PLEATED HIGH WAIST BABY SKIRT | FREE PATTERN
Waist Measurement (inches)
19
Skirt Length (inches)
7
Materials
Dk or Worsted weight yarn
5.0 mm crochet hook
Scissors
Stitch markers
Stitches (UK Version)
Ch: Chain
Tr: Treble crochet
Slst: Slip stitch
Dc: Double Crochet
Dcblo: Double Crochet in back loops only
Gauge:
13 stitches /7.5 rows= 10 cm/4 inch square in Tr
Pattern notes
- Ch 2 at the beginning of the round does not count as a stitch
- Ch 1 at the beginning of the row (for the ribbed part) does not count as a stitch.
- The skirt length measurement above does not include the high waist (ribbed part)
- The suspenders is crossed
Pattern instructions
Ch 165 join in the round with a ss. Make sure the chain is not twisted.
Round 1: Ch 2, Tr in the first chain and into each chain around. Finish round with a ss to first Tr. 165 stitches.
Round 2: Ch 2, Tr in the first stitch and into each stitch around. Finish round with a ss to first Tr. 165 stitches.
Round 3 – Round 13: repeat round 2.
Round 14: Ch 2, Yarn over, insert your hook through the 1st stitch, then through the 10th and 11th stitch, yarn over and pull through all three stitches and complete the first Tr.
Yarn over, insert your hook through the 2nd stitch, then through the 9th and 12th stitch, yarn over and pull through all three stitches and complete the second Tr.
Yarn over, insert your hook through the 3rd stitch, then through the 8th and 13th stitch, yarn over and pull through all three stitches and complete the third Tr.
Yarn over, insert your hook through the 4th stitch, then through the 7th and 14th stitch, yarn over and pull through all three stitches and complete the fourth Tr.
Yarn over, insert your hook through the 5th stitch, then through the 6th and 15th stitch, yarn over and pull through all three stitches and complete the fifth Tr.
Continue around. Finish round with a ss to the top to the first stitch. At the end of the round, you should have 55 stitches. At this point you should have 11 pleats.
Ribbed Part
Row 1: Ch 14 Dc in the second Ch from hook, Dc in the remaining chains. 13 Dc. Skip the first stitch and ss to the 2nd stitch on the skirt.
Row 2: Turn. Do not Ch 1.Dc in BLO of each of the 13 Dc from previous row.
Row 3: Ch 1, turn. Dc in BLO in each of the 13 Dc from previous row. Skip a stitch then ss into the next stitch on the skirt
Row 4-55: repeat rows 2 and 3. Finish with a repeat of row 3. Ch 1 and cut yarn.
Sew the first row to the last row. If you don’t want to add suspenders, just weave in your ends.
If you want to add suspenders note the first and last rows. So you know where to start counting stitches for the suspenders
Suspenders
Row 1: Skip 4 from the first row of rib. reattach yarn with a slip knot to the next stitch, Ch 1 to secure, Dc into same stitch and into the next 4 stitches. (5 Dc)
Row 2: Ch 1, turn. Dc in the first stitch and in each stitch across. (5 Dc)
Row 3- 56: repeat row 2
Row 57: Ch 1, turn. Dc in the first stitch, Ch 3, skip 3, Dc into the last stitch (5 stitches)
Row 58: Ch 1, turn. Dc in the first stitch, Dc 3 into the Ch 3 space, Dc into the last stitch. (5 Dc )
Row 59: Ch 1, turn. Dc in the first stitch and in each stitch across. (5 Dc)
Row 60: Ch 1, turn. Dc in the first stitch and in each stitch across. (5 Dc)
Row 61: Ch 1, turn. Dc in the first stitch, Ch 3, skip 3, Dc into the last stitch (5 stitches)
Row 62: Ch 1, turn. Dc in the first stitch, Dc 3 into the Ch 3 space, Dc into the last stitch. (5 Dc)
Row 63: Ch 1, turn. Dc in the first stitch and in each stitch across. (5 Dc)
Row 64: Ch 1, turn. Dc in the first stitch and in each stitch across. (5 Dc). Ch 1 and cut yarn
Repeat for the second suspender on the other end
Buttons
To fix the Button count 11 from the strap, and attach the button to the next stitch, leave about a inch in between and attach the other button below the first one. Repeat same for the other strap.
Finishing
Weave in all ends.
FINISHED PROJECT
Disclaimer:
All patterns and pictures on https://www.toyslabcreations.com is a property of Toyslab Creations. Please do not reprint, publish or post my patterns in whole or in part. Please don’t use my photos to advertise if you use my patterns to make and sell finished items.
Connect with me on Social Media