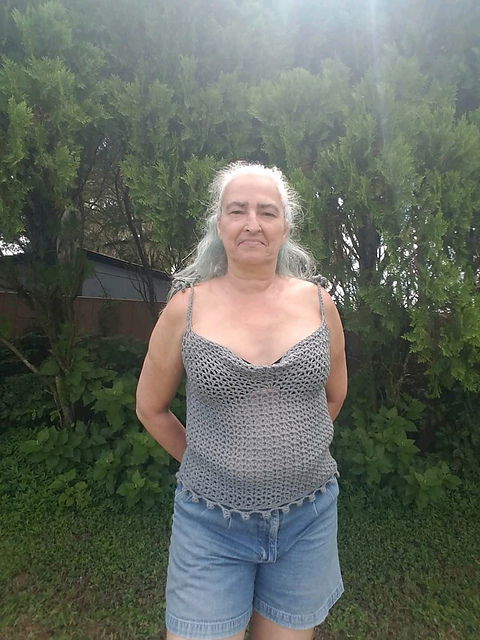
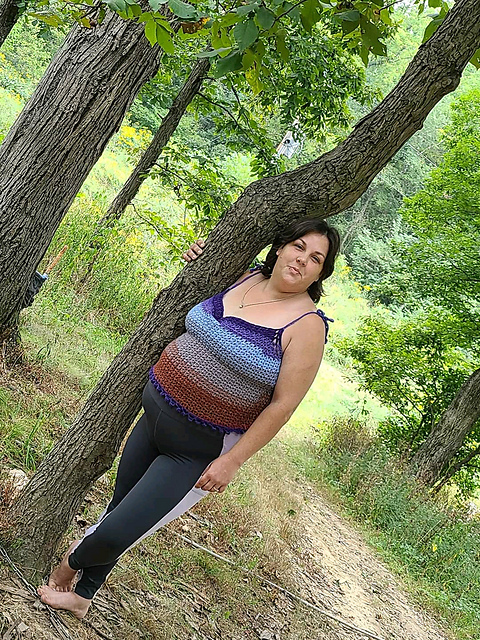
Need an adorable crochet top for spring and summer? The easy crochet cowl neck top with this beautiful edging is just perfect for the weather. This easy crochet top pattern will definitely be a beautiful addition to your summer wardrobe.
DESIGN
This crochet cowl neck top features a beautiful and easy crochet lacy design pattern which is achieved with V-stitch. It has straps that holds the top at the shoulders. It is worked bottom up. The front and back panels are made separately and then seamed together. Did I mention the beautiful pompom edging?
EASY
This lacy crochet top makes use of mainly V-stitch, and double crochet stitches, they are all basic crochet stitch. The PDF pattern gives instructions for 5 different sizing options and there is also a video tutorial for visual learners.
YARN
I used DK weight yarn for this crochet top pattern. You can use any DK weight yarn of your choice, plain, verigated yarn or even use a combination of colors.
MAKE IT YOUR OWN
The video tutorial shows a shorter, crop version of the top, you can make that or make the longer version with a bit more length as shown in this blog post.
SIZES
This easy lacy crochet top contains instructions for 5 sizing options, which are bust 34(38,42,46, 50) Inches
This blog post contains instructions for bust for all sizes . You can find the Ad-free printable PDF pattern which includes photos in my Ravelry, LoveCrafts, Ko-fi and Etsy shops.
Read on to find the free crochet cowl neck top pattern below or find the ad-free printable pdf version on Ravelry, Love Crafts, Ko-fi and Etsy.
If you prefer video tutorials, you can watch the video tutorial for this free crochet cowl neck top pattern above.
Also watch more crochet video tutorials of my patterns on my YouTube channel. Subscribe and turn on notifications so you won’t miss any of my future videos. Happy crocheting!
PDF PATTERN
If you prefer to work offline or if you would like to support my work, purchase the ad-free printable pdf version, including all photo tutorials on Ravelry, Love Crafts, Ko-fi and Etsy.
Purchase the Ad-Free PDF below


PIN it for later here

Save this pattern to your Ravelry favourite here
Check Out These Other Free Crochet Patterns
Free Crochet Strap Cowl Neck Top | Free Pattern
Sizes
Small( Medium, large, X-large,2X)
Bust Measurement
34(38,42,46, 50) Inches
Materials
Light worsted weight yarn
4.0 mm crochet hook
Tapestry needle
Scissors
Stitch Guide (US Version)
Ch: Chain
Dc: Double crochet
V stitch: (Dc Ch 1 Dc) all in the same
space.
V2tog: V stitch two together. Instead of a V stitch, make Dc in the V stitch from the previous row, Ch 1, Dc in the next v stitch.
V3tog: V stitch three together. Instead of a V stitch, make Dc in the V stitch from the previous row, Dc in the next V stitch, Ch 1, Dc in the next V stitch.
Slst: Slip stitch
Gauge :
6 stitches /8 rows= 10 cm/4 inch square in V stitches
Pattern note
• Chain 3 counts as a stitch
• If your bust measurements falls in between e.g bust 36 should make size small, bust 40 should make size medium.
• The 2 Dc on the edges count as V stitches.
• Dc made into different V stitches (V2tog, V3tog) count as a stitch.
Pattern instructions
Front Panel
Ch 76(82,94,100,112)
Row 1: Dc in 4th chain from hook, Ch 1, skip 1, V stitch in next stitch, *skip 2 chains V stitch in next chain* repeat till the end of the row. Finish the row with Ch 1,skip 2 chains Dc in the last two stitches.25(27,31,33,37) V stitches including the 2 Dc on the edges.
Row 2: Ch 3 and turn, 1 Dc in the next stitch, Ch 1, *V stitch in the Ch 1 space of the V stitch from previous row* repeat till end of the row. Finish the row with Ch 1, 1 Dc in each of the last 2 Dc from previous row.
25(27,31,33,37) V stitches.
Row 3 – 23: repeat row 2. When you reach row 23, Mark the centre V
stitch, which is 13th(14th, 16th,17th,19th) V Stitch.
Row 24: Ch 3 and turn, 1 Dc in the next stitch, Ch 1, *V stitch in the Ch 1
space of the V stitch from previous row* repeat till you reach the marked V stitch. Make 2 V stitches into the marked stitch, continue into the next stitch *V stitch in the Ch 1 space of the V stitch from previous row* repeat till end of the row. Finish the row with Ch 1, 1 Dc in each of the last 2 Dc from previous row. You should have 26(28,32,34,38) V stitches.
Row 25: Ch 3 and turn, 1 Dc in the next stitch, Ch 1, *V stitch in the Ch 1
space of the V stitch from previous row* repeat till end of the row. Finish the row with Ch 1, 1 Dc in each of the last 2 Dc from previous row. 26(28,32,34,38) V stitches.
Row 26: Ch 3 and turn, 1 Dc in the next stitch, Ch 1, *V stitch in the Ch 1 space of the V stitch from previous row* repeat till the 12th (13th, 15th,
16th, 18th) V stitch. Make 2 V stitches into the 13th & 14th (14th &
15th, 16th & 17th, 17th & 18th, 19th & 20th) continue into the next stitch *V stitch in the Ch 1 space of the V stitch from previous row* repeat till end of the row. Finish the row with Ch 1, 1 Dc in each of the last 2 Dc from previous row. You should have 28(30,34,36,40) V stitches.
Row 27: Ch 3 and turn, 1 Dc in the next stitch, Ch 1, *V stitch in the Ch 1
space of the V stitch from previous row* repeat till end of the row. Finish the row with Ch 1, 1 Dc in each of the last 2 Dc from previous row.
28(30,34,36,40) V stitches.
X-Small, Small, Medium
Row 28: Ch 3 and turn, 1 Dc in the next stitch, Ch 1, V2tog *V stitch in
the Ch 1 space of the V stitch from previous row* repeat till the 13th
(14th, 16th) V stitch. Make 2 V stitches into the 14th&15th (15th&16th, 17th&18th) continue into the next stitch *V stitch in the Ch 1 space of the V stitch from previous row* repeat till end of the row. Finish the row with V2tog, Ch 1, 1 Dc in each of the last 2 Dc from previous row. Counting the Dc in different V stitches as a stitch, you should have 28(30,34) V stitches.
Large, X-large
Row 28: Ch 3 and turn, 1 Dc in the next stitch, Ch 1, V3tog *V stitch in
the Ch 1 space of the V stitch from previous row* repeat till the 17th
(19th ) V stitch. Make 2 V stitches into the 18th&19th (20th 21st) continue into the next stitch *V stitch in the Ch 1 space of the V stitch from previous row* repeat till end of the row. Finish the row with V3tog, Ch 1, 1 Dc in each of the last 2 Dc from previous row. Counting the Dc in
different V stitches as a stitch, you should have 34(38) V stitches.
Row 29: Ch 3 and turn, 1 Dc in the next stitch, Ch 1, V2tog *V stitch in
the Ch 1 space of the V stitch from previous row* repeat till end of the
row. Finish the row with V2tog Ch 1, 1 Dc in each of the last 2 Dc from
previous row. 26(28,32, 32,36) V stitches.
Row 30: Ch 3 and turn, 1 Dc in the next stitch, Ch 1, V2tog *V stitch in
the Ch 1 space of the V stitch from previous row* repeat till the 12th
(13th, 15th, 16th, 18th) V stitch. Make 2 V stitches into the 13th &
14th (14th & 15th, 16th & 17th, 17th & 18th, 19th & 20th) continue into
the next stitch *V stitch in the Ch 1 space of the V stitch from previous
row* repeat till end of the row. Finish the row with V2tog Ch 1, 1 Dc in each of the last 2 Dc from previous row. Counting the Dc in different V
stitches as a stitch, you should have 26(28,32, 32,36) V stitches.
Row 31: Ch 3 and turn, 1 Dc in the next stitch, Ch 1, V2tog *V stitch in
the Ch 1 space of the V stitch from previous row* repeat till end of the
row. Finish the row with V2tog Ch 1, 1 Dc in each of the last 2 Dc from
previous row. 24(26,30, 30,34) V stitches.
Row 32: Ch 3 and turn, 1 Dc in the next stitch, Ch 1, V2tog *V stitch in
the Ch 1 space of the V stitch from previous row* repeat till the
11th(12th, 14th, 15th, 17th) V stitch. Make 2 V stitches into the 12th &
13th (13th & 14th, 15th & 16th, 16th & 17th, 18th & 19th) continue into
the next stitch *V stitch in the Ch 1 space of the V stitch from previous
row* repeat till end of the row. Finish the row with V2tog Ch 1, 1 Dc in each of the last 2 Dc from previous row. Counting the Dc in different V
stitches as a stitch, you should have 24(26,30, 30,34) V stitches.
Row 33: Ch 3 and turn, 1 Dc in the next stitch, Ch 1, V2tog *V stitch in
the Ch 1 space of the V stitch from previous row* repeat till end of the
row. Finish the row with V2tog Ch 1, 1 Dc in each of the last 2 Dc from
previous row. 22(24,28, 28,32) V stitches. Ch1 and cut yarn.
Back Panel
Ch 76(82,94,100,112)
Row 1: Dc in 4th chain from hook, Ch 1, skip 1, V stitch in next stitch, *skip 2 chains V stitch in next chain* repeat till the end of the row. Finish the row with Ch 1,skip 2 chains Dc in the last two stitches.25(27,31,33,37) V stitches including the 2 Dc on the edges .
Row 2: Ch 3 and turn, 1 Dc in the next stitch, Ch 1, *V stitch in the Ch 1
space of the V stitch from previous row* repeat till end of the row.Finish the row with Ch 1, 1 Dc in each of the last 2 Dc from previous row. 25(27,31,33,37) V stitches.
Row 3 – 26: repeat row 2. 25(27,31,33,37) V stitches
Straps
Front straps
Rejoin yarn with a slip knot to one of the inner Dc on the right edge, Ch 61, Sc in the second stitch from hook and in each stitch across, (60 Sc) Slst to the outer Dc, Ch 1 and cut yarn. Rejoin yarn with a slip knot to one of the outer Dc on the left edge, Ch 61, Sc in the second stitch from hook and in each stitch across, (60 Sc) Slst to the inner Dc, Ch 1 and cut yarn.
Back straps
X-Small( Small, medium)
Rejoin yarn with a slip knot to the 5th V stitch from both ends. Ch 61, Sc in the second stitch from hook and in each stitch across, (60 Sc) Slst back
into the V stitch, Ch 1 and cut yarn.
(large, X-large)
Rejoin yarn with a slip knot to the 6th V stitch from both ends. Ch 61, Sc in the second stitch from hook and in each stitch across, (60 Sc) Slst back
into the V stitch, Ch 1 and cut yarn.
Side seams
With the right side facing, make sure both pieces align. Sew up both side
seam to row 26
Edging
Rejoin yarn with a slip knot to one of the sides. Ch 1 to secure, Sc in each
stitch around. Slst to the first Sc. The instructions for the final row of
edging is contained in the this pattern by Angela Marie Henson. I have
asked for permission to use it in this pattern. You can access the pattern
on ravelry as a free download at https://www.ravelry.com/patterns/li
brary/pompom-fringe-border
FINISHED TOP
You can reduce the number of rows if you want to make the top shorter.
You can visit https://youtu.be/AgTN7AkZil8 for the video tutorial with shorter number of rows.
UK Version
Free Crochet Strap Cowl Neck Top | Free Pattern
Sizes
Small( Medium, large, X-large,2X)
Bust Measurement
34(38,42,46, 50) Inches
Materials
Light worsted weight yarn
4.0 mm crochet hook
Tapestry needle
Scissors
Stitch Guide (UK Version)
Ch: Chain
Tr: Treble crochet
V stitch: (Tr Ch 1 Tr) all in the same
space.
V2tog: V stitch two together. Instead of a V stitch, make Tr in the V stitch from the previous row, Ch 1, Tr in the next v stitch.
V3tog: V stitch three together. Instead of a V stitch, make Tr in the V stitch from the previous row, Tr in the next V stitch, Ch 1, Tr in the next V stitch.
SS: Slip stitch
Gauge :
6 stitches /8 rows= 10 cm/4 inch square in V stitches
Pattern note
• Chain 3 counts as a stitch
• If your bust measurements falls in between e.g bust 36 should make size small, bust 40 should make size medium.
• The 2 Tr on the edges count as V stitches.
• Tr made into different V stitches (V2tog, V3tog) count as a stitch.
Pattern instructions
Front Panel
Ch 76(82,94,100,112)
Row 1: Tr in 4th chain from hook, Ch 1, skip 1, V stitch in next stitch, *skip 2 chains V stitch in next chain* repeat till the end of the row. Finish the row with Ch 1,skip 2 chains Tr in the last two stitches.25(27,31,33,37) V stitches including the 2 Tr on the edges.
Row 2: Ch 3 and turn, 1 Tr in the next stitch, Ch 1, *V stitch in the Ch 1 space of the V stitch from previous row* repeat till end of the row. Finish the row with Ch 1, 1 Tr in each of the last 2 Tr from previous row.
25(27,31,33,37) V stitches.
Row 3 – 23: repeat row 2. When you reach row 23, Mark the centre V
stitch, which is 13th(14th, 16th,17th,19th) V Stitch.
Row 24: Ch 3 and turn, 1 Tr in the next stitch, Ch 1, *V stitch in the Ch 1
space of the V stitch from previous row* repeat till you reach the marked V stitch. Make 2 V stitches into the marked stitch, continue into the next stitch *V stitch in the Ch 1 space of the V stitch from previous row* repeat till end of the row. Finish the row with Ch 1, 1 Tr in each of the last 2 Tr from previous row. You should have 26(28,32,34,38) V stitches.
Row 25: Ch 3 and turn, 1 Tr in the next stitch, Ch 1, *V stitch in the Ch 1
space of the V stitch from previous row* repeat till end of the row. Finish the row with Ch 1, 1 Tr in each of the last 2 Tr from previous row. 26(28,32,34,38) V stitches.
Row 26: Ch 3 and turn, 1 Tr in the next stitch, Ch 1, *V stitch in the Ch 1 space of the V stitch from previous row* repeat till the 12th (13th, 15th,
16th, 18th) V stitch. Make 2 V stitches into the 13th & 14th (14th &
15th, 16th & 17th, 17th & 18th, 19th & 20th) continue into the next stitch *V stitch in the Ch 1 space of the V stitch from previous row* repeat till end of the row. Finish the row with Ch 1, 1 Tr in each of the last 2 Tr from previous row. You should have 28(30,34,36,40) V stitches.
Row 27: Ch 3 and turn, 1 Tr in the next stitch, Ch 1, *V stitch in the Ch 1
space of the V stitch from previous row* repeat till end of the row. Finish the row with Ch 1, 1 Tr in each of the last 2 Tr from previous row.
28(30,34,36,40) V stitches.
X-Small, Small, Medium
Row 28: Ch 3 and turn, 1 Tr in the next stitch, Ch 1, V2tog *V stitch in
the Ch 1 space of the V stitch from previous row* repeat till the 13th
(14th, 16th) V stitch. Make 2 V stitches into the 14th&15th (15th&16th, 17th&18th) continue into the next stitch *V stitch in the Ch 1 space of the V stitch from previous row* repeat till end of the row. Finish the row with V2tog, Ch 1, 1 Tr in each of the last 2 Tr from previous row. Counting the Tr in different V stitches as a stitch, you should have 28(30,34) V stitches.
Large, X-large
Row 28: Ch 3 and turn, 1 Tr in the next stitch, Ch 1, V3tog *V stitch in
the Ch 1 space of the V stitch from previous row* repeat till the 17th
(19th ) V stitch. Make 2 V stitches into the 18th&19th (20th 21st) continue into the next stitch *V stitch in the Ch 1 space of the V stitch from previous row* repeat till end of the row. Finish the row with V3tog, Ch 1, 1 Tr in each of the last 2 Tr from previous row. Counting the Tr in
different V stitches as a stitch, you should have 34(38) V stitches.
Row 29: Ch 3 and turn, 1 Tr in the next stitch, Ch 1, V2tog *V stitch in
the Ch 1 space of the V stitch from previous row* repeat till end of the
row. Finish the row with V2tog Ch 1, 1 Tr in each of the last 2 Tr from
previous row. 26(28,32, 32,36) V stitches.
Row 30: Ch 3 and turn, 1 Tr in the next stitch, Ch 1, V2tog *V stitch in
the Ch 1 space of the V stitch from previous row* repeat till the 12th
(13th, 15th, 16th, 18th) V stitch. Make 2 V stitches into the 13th &
14th (14th & 15th, 16th & 17th, 17th & 18th, 19th & 20th) continue into
the next stitch *V stitch in the Ch 1 space of the V stitch from previous
row* repeat till end of the row. Finish the row with V2tog Ch 1, 1 Tr in each of the last 2 Tr from previous row. Counting the Tr in different V
stitches as a stitch, you should have 26(28,32, 32,36) V stitches.
Row 31: Ch 3 and turn, 1 Tr in the next stitch, Ch 1, V2tog *V stitch in
the Ch 1 space of the V stitch from previous row* repeat till end of the
row. Finish the row with V2tog Ch 1, 1 Tr in each of the last 2 Tr from
previous row. 24(26,30, 30,34) V stitches.
Row 32: Ch 3 and turn, 1 Tr in the next stitch, Ch 1, V2tog *V stitch in
the Ch 1 space of the V stitch from previous row* repeat till the
11th(12th, 14th, 15th, 17th) V stitch. Make 2 V stitches into the 12th &
13th (13th & 14th, 15th & 16th, 16th & 17th, 18th & 19th) continue into
the next stitch *V stitch in the Ch 1 space of the V stitch from previous
row* repeat till end of the row. Finish the row with V2tog Ch 1, 1 Tr in each of the last 2 Tr from previous row. Counting the Tr in different V
stitches as a stitch, you should have 24(26,30, 30,34) V stitches.
Row 33: Ch 3 and turn, 1 Tr in the next stitch, Ch 1, V2tog *V stitch in
the Ch 1 space of the V stitch from previous row* repeat till end of the
row. Finish the row with V2tog Ch 1, 1 Tr in each of the last 2 Tr from
previous row. 22(24,28, 28,32) V stitches. Ch1 and cut yarn.
Back Panel
Ch 76(82,94,100,112)
Row 1: Tr in 4th chain from hook, Ch 1, skip 1, V stitch in next stitch, *skip 2 chains V stitch in next chain* repeat till the end of the row. Finish the row with Ch 1,skip 2 chains Tr in the last two stitches.25(27,31,33,37) V stitches including the 2 Tr on the edges .
Row 2: Ch 3 and turn, 1 Tr in the next stitch, Ch 1, *V stitch in the Ch 1
space of the V stitch from previous row* repeat till end of the row.Finish the row with Ch 1, 1 Tr in each of the last 2 Tr from previous row. 25(27,31,33,37) V stitches.
Row 3 – 26: repeat row 2. 25(27,31,33,37) V stitches
Straps
Front straps
Rejoin yarn with a slip knot to one of the inner Tr on the right edge, Ch 61, Sc in the second stitch from hook and in each stitch across, (60 Sc) SS to the outer Tr, Ch 1 and cut yarn. Rejoin yarn with a slip knot to one of the outer Tr on the left edge, Ch 61, Sc in the second stitch from hook and in each stitch across, (60 Sc) SS to the inner Tr, Ch 1 and cut yarn.
Back straps
X-Small( Small, medium)
Rejoin yarn with a slip knot to the 5th V stitch from both ends. Ch 61, Sc in the second stitch from hook and in each stitch across, (60 Sc) SS back
into the V stitch, Ch 1 and cut yarn.
(large, X-large)
Rejoin yarn with a slip knot to the 6th V stitch from both ends. Ch 61, Sc in the second stitch from hook and in each stitch across, (60 Sc) SS back
into the V stitch, Ch 1 and cut yarn.
Side seams
With the right side facing, make sure both pieces align. Sew up both side
seam to row 26
Edging
Rejoin yarn with a slip knot to one of the sides. Ch 1 to secure, Sc in each
stitch around. SS to the first Sc. The instructions for the final row of
edging is contained in the this pattern by Angela Marie Henson. I have
asked for permission to use it in this pattern. You can access the pattern
on ravelry as a free download at https://www.ravelry.com/patterns/library/pompom-fringe-border
FINISHED TOP
You can reduce the number of rows if you want to make the top shorter.
You can visit https://youtu.be/AgTN7AkZil8 for the video tutorial with shorter number of rows.
Disclaimer
All patterns and pictures on this Website is a property of Toyslab Creations. Please do not reprint, publish or post my patterns in whole or in part. Please don’t use my photos to advertise if you use my patterns to make and sell finished items.
Connect with me on Social Media