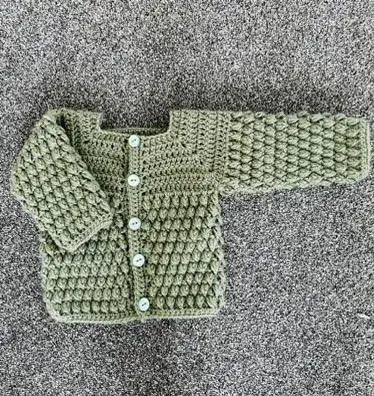
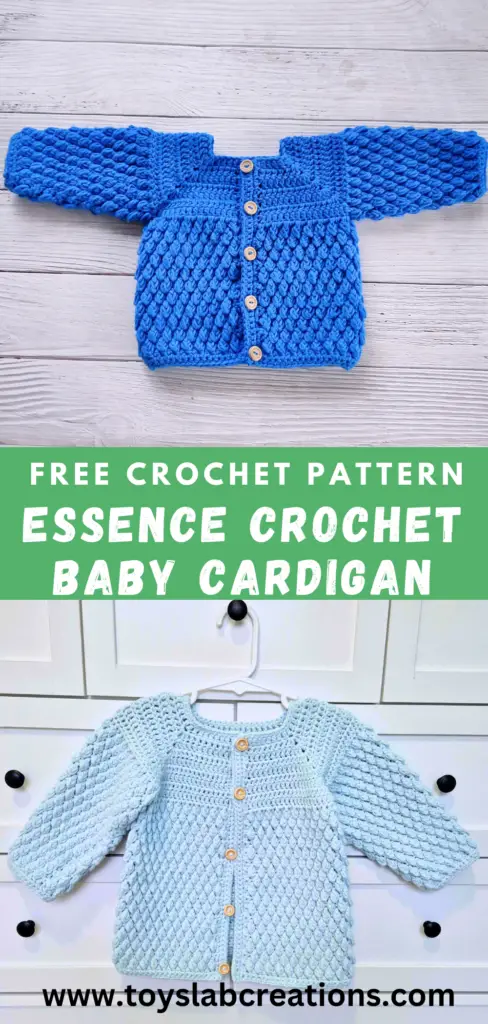
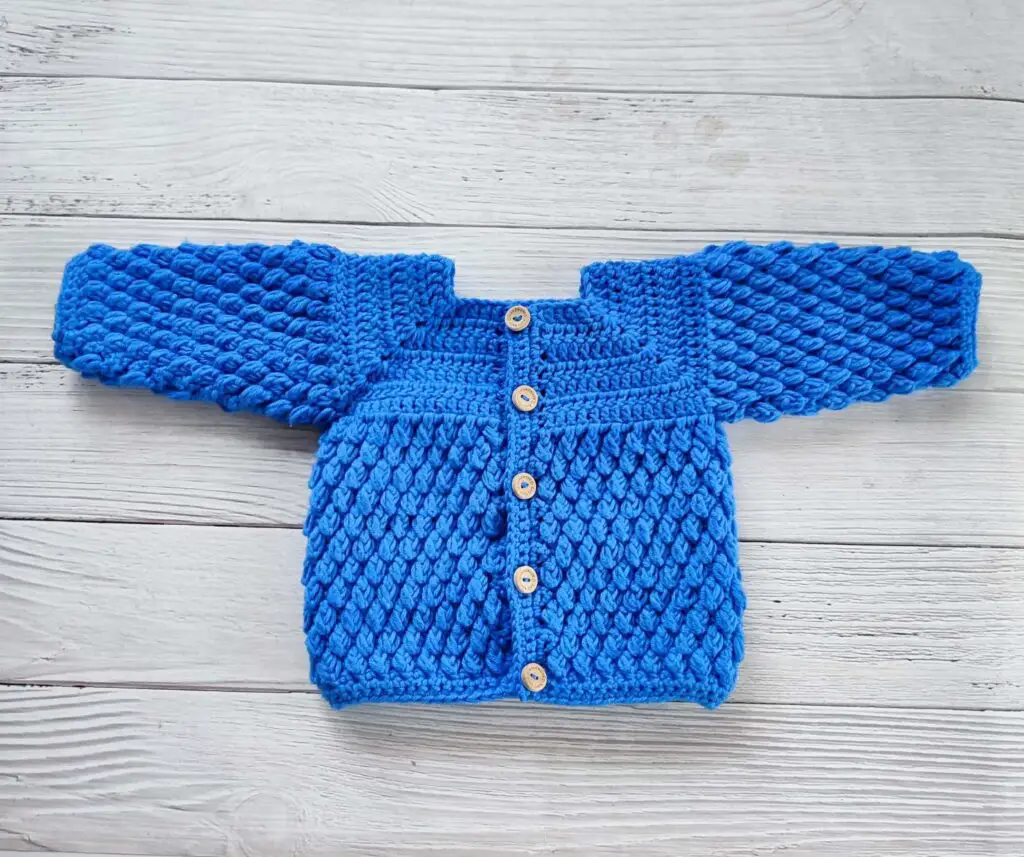
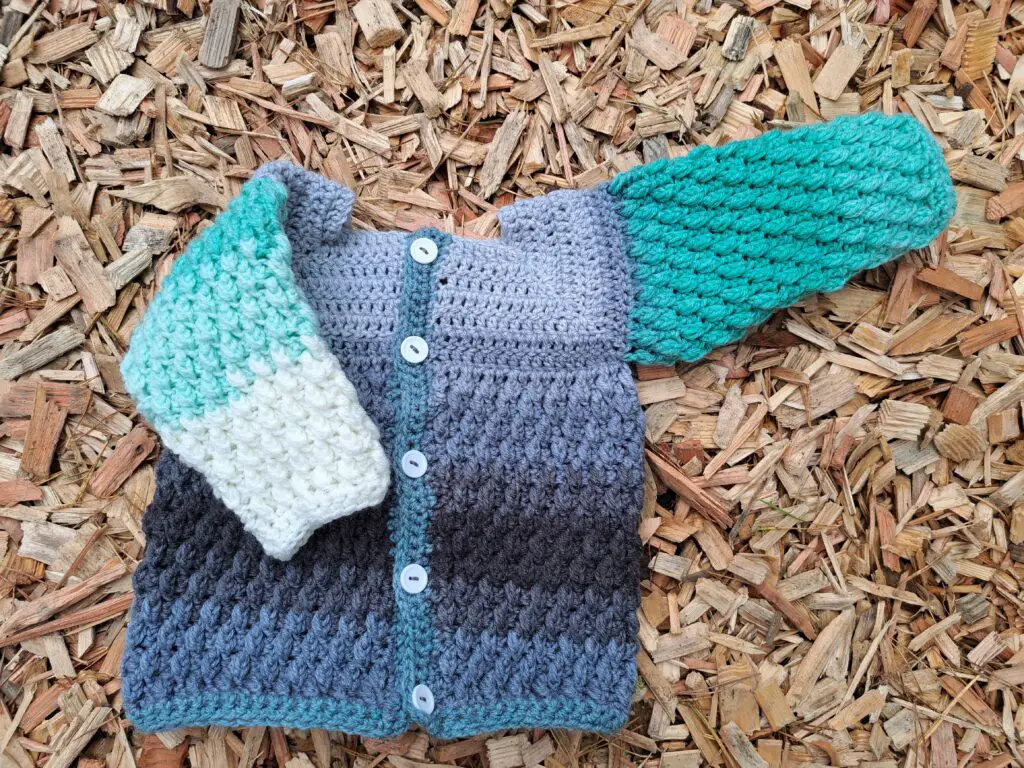
Make this beautiful, warm and cozy crochet baby cardigan for your little one this winter. This easy crochet baby cardigan is just great for the cold days. I love how the rich texture of this easy crochet cardigan pattern makes it very cute. Make the essence crochet baby cardigan for little ones or as a gift for baby shower. Follow this easy crochet pattern and get ready your baby ready for the winter season with this warm and adorable crochet cardigan.
DESIGN
This crochet baby cardigan is worked top down. The bodice is worked in double crochet. The beautiful texture of this crochet baby cardigan is achieved with the modified alpine stitch. It has a very bold and beautiful texture.
EASY
The Essence Crochet baby cardigan pattern is very easy to make, it has clear instructions, once you get the hang of the modified alpine stitch, you can can make it with minimal attention.
TEXTURE
This crochet baby cardigan pattern has a very thick texture, which makes it perfect for the cold weather. Make this adorable crochet baby cardigan pattern for your cute little ones this holiday season.
YARN
I used worsted weight yarn for this easy crochet baby cardigan pattern. You can use any worsted weight yarn of your choice. You can mix colors or even use variegated yarn.
SIZES
The essence crochet baby cardigan pattern provides instructions for three sizing options, including 0-6 months (6-12 months, 1-2 years)
This blog post contains instructions for Size 0-6 months. If you like to make it in 6-12 or 1-2 years sizes, or you desire to support my craft, the ad-free printable PDF pattern, that contains pictorial guides is available for purchase on Ravelry, LoveCrafts, Ko-fi, and Etsy.
PDF PATTERN
If you prefer to work offline or if you would like to support my work, purchase the ad-free printable pdf version, including all photo tutorials on Ravelry, LoveCrafts, Ko-fi and Etsy shops.
Purchase the Ad -Free PDF below


PIN it for later here
Save this pattern to your Ravelry favorites here
You might also be interested in these other free crochet patterns
ESSENCE CROCHET BABY CARDIGAN | FREE PATTERN
Materials:
4.0 and 5.0 mm crochet hook
Light worsted weight yarn – 3-4 (100g) balls
Stitch markers (Optional) Yarn needle
5 pieces of 15mm buttons
Difficulty:
Intermediate
Gauge:
4.0 mm
15 stitches/ 10 rows = 10cm/ 4 inches square in Dc
Stitches (US Version)
Ch: Chain
Sc: Single Crochet
Dc: Double Crochet
MAS: Modified Alpine Stitch
Yarn over, insert the hook around the front post of the desired stitch, yarn over, pull through (you have three loops on your hook), yarn over insert through the same spot, yarn over, pull through ( you have five loops on your hook), yarn over pull through four, yarn over pull through two.
Slst: Slip Stitch
Sc2tog: Single crochet two together
Pattern Note
• Ch 1 at the beginning of the row does not count as a stitch.
• Ch 2 at the beginning of the row counts as a stitch.
• The cardigan is worked top down
Pattern Instructions:
With 4mm crochet hook Ch 48
Row 1: Skip 2 chains, Dc in the 3rd chain from the hook, Dc in each stitch across. 47 Dc
Row 2: Ch 2, turn. Skip first stitch, Dc in the next 5, 2 Dc, Ch 1, 2 Dc all in the next stitch, Dc 9, 2 Dc , Ch 1, 2 Dc all in the next stitch, Dc 13, 2 Dc , Ch 1, 2 Dc all in the next stitch, Dc 9, 2 Dc , Ch 1, 2 Dc all in the next stitch, Dc 6. 59 Dc
Row 3: Ch 2, turn. Skip first stitch,Dc in the next 7, 2 Dc, Ch 1, 2 Dc all in the next stitch, Dc 13, 2 Dc , Ch 1, 2 Dc all in the next stitch, Dc 17, 2 Dc , Ch 1, 2 Dc all in the next stitch, Dc 13, 2 Dc , Ch 1, 2 Dc all in the next stitch, Dc 8. 75 Dc
Row 4: Ch 2, turn. Skip first stitch,Dc in the next 9, 2 Dc, Ch 1, 2 Dc all in the next stitch, Dc 17, 2 Dc , Ch 1, 2 Dc all in the next stitch, Dc 21, 2 Dc , Ch 1, 2 Dc all in the next stitch, Dc 17, 2 Dc , Ch 1, 2 Dc all in the next stitch, Dc 10. 91 Dc
Row 5: Ch 2, turn. Skip first stitch,Dc in the next 11, 2 Dc, Ch 1, 2 Dc all in the next stitch, Dc 21, 2 Dc , Ch 1, 2 Dc all in the next stitch, Dc 25, 2 Dc , Ch 1, 2 Dc all in the next stitch, Dc 21, 2 Dc , Ch 1, 2 Dc all in the next stitch, Dc 12. 107) Dc
Row 6: Ch 2, turn. Skip first stitch,Dc in the next 13, 2 Dc, Ch 1, 2 Dc all in the next stitch, Dc 25, 2 Dc , Ch 1, 2 Dc all in the next stitch, Dc 29, 2 Dc , Ch 1, 2 Dc all in the next stitch, Dc 25, 2 Dc , Ch 1, 2 Dc all in the next stitch, Dc 14. 123 Dc
Joining sleeves
Row7:Ch 2, turn. Skip the first stitch, Dc in the next 15, Dc in the Ch 1 space, skip the next 29 stitches, fold bodice to make Ch 1 space match evenly with the next Ch 1 space, Ch 1, Dc in the next Ch 1 Space, Dc in the next 33, Dc in the next Ch 1 space, skip the next 29 stitches, fold bodice to make Ch 1 space match evenly with the next Ch 1 space, Ch 1, Dc in the next Ch 1 Space, Dc in the last 16 stitches. 71 stitches.
Row 8:Ch 2,turn. Skip the first stitch, Dc in the 2nd stitch and in each stitch across, including the Ch 1 at both arm holes. 71 Dc.
Using 5 mm hook
Row9:Ch 2, mark the top of the Ch 2 ,turn. MAS around the post of the 2nd stitch, *Dc in the next stitch, MAS around the post of the next stitch* repeat across. Finish the row with a Dc in the last stitch. 71 stitches.
Row10:Ch 1, turn. Sc in the first stitch, Sc into each stitch across. 71 Sc.
Row11:Ch 2, mark the top of the Ch 2 ,turn. Skip first stitch. Dc in the next stitch, MAS around the post of the 3rd stitch from two rows below, *Dc in the next stitch, MAS around the post of the next stitch from two rows below* repeat across. Finish the row with a Dc in the last two stitches. 71 stitches.
Row12:Ch 1, turn. Sc in the first stitch, Sc into each stitch across. 71 Sc.
Row13:Ch 2, mark the top of the Ch 2 ,turn. MAS around the post of the 2nd stitch from two rows below, *Dc in the next stitch, MAS around the post of the next stitch from two rows below* repeat across. Finish the row with a Dc in the last stitch. 71 stitches.
Rows 14-29: Repeat rows 10-13
It ends with a repeat of row 13
Rows 30-31: Ch 1, turn. Sc in the first stitch, Sc into each stitch across. 71 Sc. Do not cut.
ButtonBand
With 4mm crochet hook
With the right side facing you, on the bottom right of the cardigan, start making the button band.
Row 1:Ch 1, Sc on the side of the first stitch, mark stitch, Sc on the side of each row, until you get to the rows of Dc at the upper part of the cardigan 23 Sc. For the rows of Dc, make 2 Sc on the side of each row. Total 39 Sc
Row 2:Ch 1, turn, Sc in the first stitch, Sc in each stitch across. 39 Sc
Row3:Repeat row 2. Ch 1 and cut yarn.
ButtonholeBand
With the right side facing you, reattach yarn to the top left of the cardigan,
Row 1:Ch 1, 2 Sc on the side of each of the Dc rows,16 Sc on the side of the remaining rows all the way across, total 39 Sc
Row2:Ch 1, turn. Sc in the first stitch,*Ch 1, skip 1, Sc in the next 8 stitches* repeat 3 more times, Ch 1, skip 1, Sc in the last stitch.
Row 3:Ch 1, turn, Sc in the first stitch, Sc in each stitch across including the Ch 1 space. 39 Sc. Ch 1 and cut yarn.
Sleeves
With 4mm crochet hook, working on the wrong side of the project
Reattach yarn to the Ch 1 made when joining the sleeves.
Round 1: Ch 2, mark the top of Ch 2, 2 Dc on the side of the Dc next to it, Dc in the next 29 stitches, 2 Dc on the side of the next Dc, slst to the first stitch of the round. 34 Dc
Round 2:Ch 2, mark the top of the Ch 2 ,turn to the right side. MAS around the post of the 2nd stitch, *Dc in the next stitch, MAS around the post of the next stitch* repeat around. Dc in the last stitch.Finish the round with a slst to the first stitch of the round. 34 stitches.
Round3:Ch 1, turn to the wrong side. Sc in the first stitch, Sc into each stitch until the last two stitches, Sc2tog. Finish the round with a slst to the first stitch of the round. 33 Sc.
Round4:Ch 2, mark the top of the Ch 2 ,turn to the right side. Dc in the next stitch, MAS around the post of the 3rd stitch from two rounds below, *Dc in the next stitch, MAS around the post of the next stitch from two rounds below* repeat around. Dc in the last two stitches. Finish the round with a slst to the first stitch of the round. 33 stitches.
Round 5:Ch 1, turn to the wrong side. Sc in the first stitch, Sc into each stitch until the last two stitches, Sc2tog. Finish the round with a slst to the first stitch of the round. 32 Sc.
Round 6:Ch 2, mark the top of the Ch 2 ,turn to the right side. MAS around the post of the 2nd stitch from two rounds below, *Dc in the next stitch, MAS around the post of the next stitch from two rounds below* repeat around. Dc in the last stitch.Finish the round with a slst to the first stitch of the round. 32 stitches.
Rounds 7-20: Repeat rounds 3-6 (ends with a repeat of round 4)
Round21:Ch 1, turn to the wrong side. Sc in the first stitch, Sc into each stitch around. Finish the round with a slst to the first stitch of the round. 25 Sc.
Round22:Ch 2, mark the top of the Ch 2 ,turn to the right side. MAS around the post of the 2nd stitch from two rounds below, *Dc in the next stitch, MAS around the post of the next stitch from two rounds below* repeat around. Dc in the last stitch.Finish the round with a slst to the first stitch of the round. 25 stitches.
Round23:Ch 1, turn to the wrong side. Sc in the first stitch, Sc into each stitch around. Finish the round with a slst to the first stitch of the round. 25 Sc.
Round 24: Ch 1, turn to the right side. Sc in the first stitch, Sc into each stitch around . Finish the round with a slst to the first stitch of the round. 25 Sc. Ch 1 and cut yarn.
Repeat instructions for second sleeve.
Attach buttons.
Finished Project
UK VERSION
Essence Crochet Baby Cardigan | Free Pattern
Materials:
4.0 and 5.0 mm crochet hook
Light worsted weight yarn – 3-4 (100g) balls
Stitch markers (Optional) Yarn needle
5 pieces of 15mm buttons
Difficulty:
Intermediate
Gauge:
4.0 mm
15 stitches/ 10 rows = 10cm/ 4 inches square in Tr
Stitches (UK Version)
Ch: Chain
Dc: Double Crochet
Tr: Treble Crochet
MAS: Modified Alpine Stitch
Yarn over, insert the hook around the front post of the desired stitch, yarn over, pull through (you have three loops on your hook), yarn over insert through the same spot, yarn over, pull through ( you have five loops on your hook), yarn over pull through four, yarn over pull through two.
Slst: Slip Stitch
Dc2tog: Double crochet two together
Pattern Note
• Ch 1 at the beginning of the row does not count as a stitch.
• Ch 2 at the beginning of the row counts as a stitch.
• The cardigan is worked top down
Pattern Instructions:
With 4mm crochet hook Ch 48
Row 1: Skip 2 chains, Tr in the 3rd chain from the hook, Tr in each stitch across. 47 Tr
Row 2: Ch 2, turn. Skip first stitch, Tr in the next 5, 2 Tr, Ch 1, 2 Tr all in the next stitch, Tr 9, 2 Tr , Ch 1, 2 Tr all in the next stitch, Tr 13, 2 Tr , Ch 1, 2 Tr all in the next stitch, Tr 9, 2 Tr , Ch 1, 2 Tr all in the next stitch, Tr 6. 59 Tr
Row 3: Ch 2, turn. Skip first stitch,Tr in the next 7, 2 Tr, Ch 1, 2 Tr all in the next stitch, Tr 13, 2 Tr , Ch 1, 2 Tr all in the next stitch, Tr 17, 2 Tr , Ch 1, 2 Tr all in the next stitch, Tr 13, 2 Tr , Ch 1, 2 Tr all in the next stitch, Tr 8. 75 Tr
Row 4: Ch 2, turn. Skip first stitch,Tr in the next 9, 2 Tr, Ch 1, 2 Tr all in the next stitch, Tr 17, 2 Tr , Ch 1, 2 Tr all in the next stitch, Tr 21, 2 Tr , Ch 1, 2 Tr all in the next stitch, Tr 17, 2 Tr , Ch 1, 2 Tr all in the next stitch, Tr 10. 91 Tr
Row 5: Ch 2, turn. Skip first stitch,Tr in the next 11, 2 Tr, Ch 1, 2 Tr all in the next stitch, Tr 21, 2 Tr , Ch 1, 2 Tr all in the next stitch, Tr 25, 2 Tr , Ch 1, 2 Tr all in the next stitch, Tr 21, 2 Tr , Ch 1, 2 Tr all in the next stitch, Tr 12. 107) Tr
Row 6: Ch 2, turn. Skip first stitch,Tr in the next 13, 2 Tr, Ch 1, 2 Tr all in the next stitch, Tr 25, 2 Tr , Ch 1, 2 Tr all in the next stitch, Tr 29, 2 Tr , Ch 1, 2 Tr all in the next stitch, Tr 25, 2 Tr , Ch 1, 2 Tr all in the next stitch, Tr 14. 123 Tr
Joining sleeves
Row7:Ch 2, turn. Skip the first stitch, Tr in the next 15, Tr in the Ch 1 space, skip the next 29 stitches, fold bodice to make Ch 1 space match evenly with the next Ch 1 space, Ch 1, Tr in the next Ch 1 Space, Tr in the next 33, Tr in the next Ch 1 space, skip the next 29 stitches, fold bodice to make Ch 1 space match evenly with the next Ch 1 space, Ch 1, Tr in the next Ch 1 Space, Tr in the last 16 stitches. 71 stitches.
Row 8:Ch 2,turn. Skip the first stitch, Tr in the 2nd stitch and in each stitch across, including the Ch 1 at both arm holes. 71 Tr.
Using 5 mm hook
Row9:Ch 2, mark the top of the Ch 2 ,turn. MAS around the post of the 2nd stitch, *Tr in the next stitch, MAS around the post of the next stitch* repeat across. Finish the row with a Tr in the last stitch. 71 stitches.
Row10:Ch 1, turn. Dc in the first stitch, Dc into each stitch across. 71 Dc.
Row11:Ch 2, mark the top of the Ch 2 ,turn. Skip first stitch. Tr in the next stitch, MAS around the post of the 3rd stitch from two rows below, *Tr in the next stitch, MAS around the post of the next stitch from two rows below* repeat across. Finish the row with a Tr in the last two stitches. 71 stitches.
Row12:Ch 1, turn. Dc in the first stitch, Dc into each stitch across. 71 Dc.
Row13:Ch 2, mark the top of the Ch 2 ,turn. MAS around the post of the 2nd stitch from two rows below, *Tr in the next stitch, MAS around the post of the next stitch from two rows below* repeat across. Finish the row with a Tr in the last stitch. 71 stitches.
Rows 14-29: Repeat rows 10-13
It ends with a repeat of row 13
Rows 30-31: Ch 1, turn. Dc in the first stitch, Dc into each stitch across. 71 Dc. Do not cut.
ButtonBand
With 4mm crochet hook
With the right side facing you, on the bottom right of the cardigan, start making the button band.
Row 1:Ch 1, Dc on the side of the first stitch, mark stitch, Dc on the side of each row, until you get to the rows of Tr at the upper part of the cardigan 23 Dc. For the rows of Tr, make 2 Dc on the side of each row. Total 39 Dc
Row 2:Ch 1, turn, Dc in the first stitch, Dc in each stitch across. 39 Dc
Row3:Repeat row 2. Ch 1 and cut yarn.
ButtonholeBand
With the right side facing you, reattach yarn to the top left of the cardigan,
Row 1:Ch 1, 2 Dc on the side of each of the Tr rows,16 Dc on the side of the remaining rows all the way across, total 39 Dc
Row2:Ch 1, turn. Dc in the first stitch,*Ch 1, skip 1, Dc in the next 8 stitches* repeat 3 more times, Ch 1, skip 1, Dc in the last stitch.
Row 3:Ch 1, turn, Dc in the first stitch, Dc in each stitch across including the Ch 1 space. 39 Dc. Ch 1 and cut yarn.
Sleeves
With 4mm crochet hook, working on the wrong side of the project
Reattach yarn to the Ch 1 made when joining the sleeves.
Round 1: Ch 2, mark the top of Ch 2, 2 Tr on the side of the Tr next to it, Tr in the next 29 stitches, 2 Tr on the side of the next Tr, slst to the first stitch of the round. 34 Tr
Round 2:Ch 2, mark the top of the Ch 2 ,turn to the right side. MAS around the post of the 2nd stitch, *Tr in the next stitch, MAS around the post of the next stitch* repeat around. Tr in the last stitch.Finish the round with a slst to the first stitch of the round. 34 stitches.
Round3:Ch 1, turn to the wrong side. Dc in the first stitch, Dc into each stitch until the last two stitches, Dc2tog. Finish the round with a slst to the first stitch of the round. 33 Dc.
Round4:Ch 2, mark the top of the Ch 2 ,turn to the right side. Tr in the next stitch, MAS around the post of the 3rd stitch from two rounds below, *Tr in the next stitch, MAS around the post of the next stitch from two rounds below* repeat around. Tr in the last two stitches. Finish the round with a slst to the first stitch of the round. 33 stitches.
Round 5:Ch 1, turn to the wrong side. Dc in the first stitch, Dc into each stitch until the last two stitches, Dc2tog. Finish the round with a slst to the first stitch of the round. 32 Dc.
Round 6:Ch 2, mark the top of the Ch 2 ,turn to the right side. MAS around the post of the 2nd stitch from two rounds below, *Tr in the next stitch, MAS around the post of the next stitch from two rounds below* repeat around. Tr in the last stitch.Finish the round with a slst to the first stitch of the round. 32 stitches.
Rounds 7-20: Repeat rounds 3-6 (ends with a repeat of round 4)
Round21:Ch 1, turn to the wrong side. Dc in the first stitch, Dc into each stitch around. Finish the round with a slst to the first stitch of the round. 25 Dc.
Round22:Ch 2, mark the top of the Ch 2 ,turn to the right side. MAS around the post of the 2nd stitch from two rounds below, *Tr in the next stitch, MAS around the post of the next stitch from two rounds below* repeat around. Tr in the last stitch.Finish the round with a slst to the first stitch of the round. 25 stitches.
Round23:Ch 1, turn to the wrong side. Dc in the first stitch, Dc into each stitch around. Finish the round with a slst to the first stitch of the round. 25 Dc.
Round 24: Ch 1, turn to the right side. Dc in the first stitch, Dc into each stitch around . Finish the round with a slst to the first stitch of the round. 25 Dc. Ch 1 and cut yarn.
Repeat instructions for second sleeve.
Attach buttons.
Finished Project
Disclaimer
All patterns and pictures on this Website is a property of Toyslab Creations. Please do not reprint, publish or post my patterns in whole or in part. Please don’t use my photos to advertise if you use my patterns to make and sell finished items.
Connect with me on Social Media